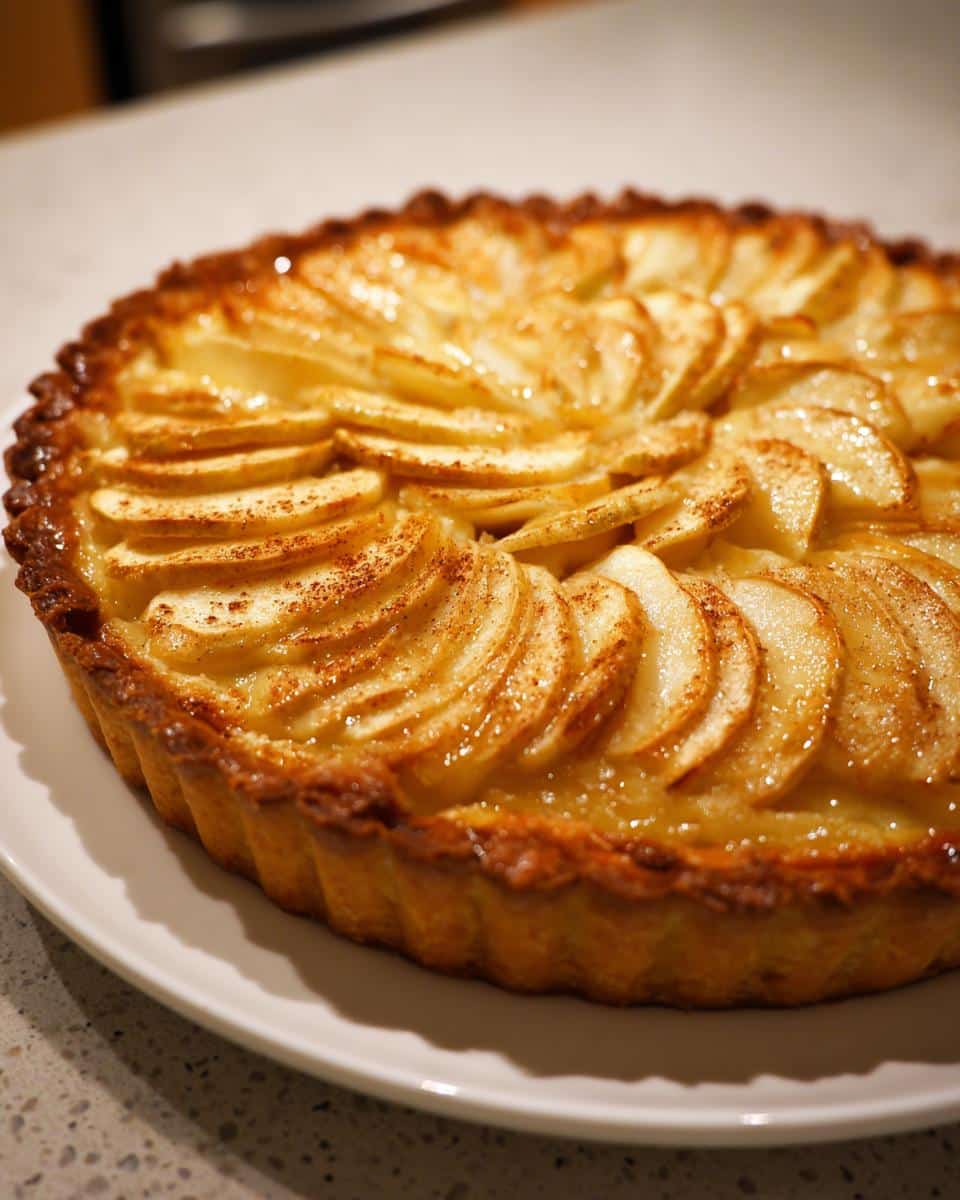
Oh, let me tell you about the magic of a French Apple Tart! This classic dessert is not just a treat; it’s a sweet embrace after a long day. The buttery pastry crust cradles tender, caramelized apples, creating a symphony of flavors that dance on your palate. I remember the first time I had it at a cozy little bistro in Paris. As I took that first bite, it felt like a warm hug from the inside out. Trust me, there’s something incredibly comforting about a slice of this tart, especially when it’s just out of the oven and still warm. Whether it’s a family gathering or a quiet evening at home, this French Apple Tart always brings a touch of elegance and a whole lot of joy to the table. You’re going to love making this!
Ingredients List
Gathering the right ingredients is key to making the perfect French Apple Tart. Here’s what you’ll need:
1 pie crust: You can use store-bought or make your own from scratch. Either way, it’s the foundation of your tart!
4 medium apples: I love using a mix of sweet and tart apples like Granny Smith and Honeycrisp for a balanced flavor. Make sure to slice them thin for even cooking!
1/4 cup sugar: This will sweeten the apples just enough to enhance their natural flavor.
1/4 cup unsalted butter: Melted butter is drizzled over the apples, adding richness and that irresistible buttery flavor.
1 tsp cinnamon: A warm spice that complements the apples beautifully. You can adjust this to your taste!
2 tbsp lemon juice: This brightens the flavor and helps prevent the apples from browning.
1 egg, beaten: For an egg wash, it gives the crust a beautiful golden color when baked.
With these simple yet delightful ingredients, you’re well on your way to creating a stunning French Apple Tart that everyone will adore!
Preparing a French Apple Tart is a delightful process that fills your kitchen with the most amazing aromas. Let’s dive right into the steps to create this classic dessert that’s sure to impress!
Step-by-Step Instructions
Preheat the oven: First things first, preheat your oven to 375°F (190°C). This ensures it’s hot and ready for that delicious tart!
Prepare the crust: Roll out your pie crust on a lightly floured surface. Make sure it’s about 1/8 inch thick, then carefully place it into your tart pan. Press it gently into the corners and trim any excess hanging over the edges.
Mix the filling: In a large bowl, toss together your thinly sliced apples, sugar, cinnamon, and lemon juice. Make sure every slice is coated! This is where the magic starts – the sweet and tangy combination will make your tart shine.
Layer the apples: Arrange the apple mixture evenly over the crust. You can overlap the slices a bit for a beautiful presentation. Don’t worry about perfection; it’ll look fabulous once it’s baked!
Add the butter: Drizzle the melted butter over the apples. This step is crucial for that rich flavor and lovely texture. Just imagine how good it’s going to taste!
Egg wash the crust: Using a pastry brush, gently brush the edges of the crust with the beaten egg. This will give it a lovely golden color and a nice sheen once baked. It’s a little detail that makes a big difference!
Bake it: Place your tart in the preheated oven and bake for 30-35 minutes. You’ll know it’s done when the apples are tender and the crust is golden brown. Keep an eye on it towards the end; every oven is a bit different!
Cool and serve: Once baked, let your tart cool for a few minutes before slicing. This will help it set up nicely. Serve it warm or at room temperature, and get ready for the compliments to roll in!
And there you have it! Each step is simple, and when you take that first bite, you’ll feel all the love and care that went into making this French Apple Tart. Enjoy!
Why You’ll Love This Recipe
It’s a classic French dessert that never goes out of style—perfect for impressing guests or indulging in a cozy night in!
Quick preparation means you can whip this up without spending all day in the kitchen. Who doesn’t love a dessert that’s both easy and impressive?
The combination of sweet and tart apples gives each bite a delightful burst of flavor, making it a crowd-pleaser!
Using fresh ingredients helps create a tart that’s not only delicious but also vibrant and beautiful.
The buttery, flaky crust pairs perfectly with the tender apple filling, creating a wonderful contrast in textures.
This recipe is versatile! You can easily customize it with your favorite spices or add nuts for a delicious twist.
It’s a great make-ahead dessert that can be enjoyed warm or at room temperature, making it perfect for any occasion.
Tips for Success
Making the perfect French Apple Tart is all about the details! Here are some of my best tips to ensure your tart turns out absolutely delicious:
Choose your apples wisely: For the best flavor, mix sweet and tart apples. I love using Granny Smith for their tartness combined with the sweetness of Honeycrisp or Fuji apples. It creates a beautiful balance!
Slice evenly: Make sure to slice your apples thinly and uniformly. This ensures they cook evenly and become tender without turning mushy. Aim for about 1/4 inch thick slices!
Don’t skip the lemon juice: The lemon juice isn’t just for flavor; it also helps keep your apples from browning. Plus, it adds a lovely brightness to the tart!
Keep an eye on the baking: Ovens can vary, so start checking your tart a few minutes before the timer goes off. You want that crust golden and the apples tender but not falling apart!
Let it cool: Give your tart a few minutes to cool before slicing. This helps it set up nicely, making it easier to serve without falling apart.
Experiment with spices: Feel free to play around with spices! A touch of nutmeg or allspice can add a warm depth of flavor that’s simply delightful.
Pair it right: Serve your French Apple Tart with a scoop of vanilla ice cream or a dollop of whipped cream for an extra special touch. The contrast of warm tart and cold cream is heavenly!
With these tips in your back pocket, you’re all set to create a stunning French Apple Tart that will wow everyone at the table! Happy baking!
Variations
The beauty of a French Apple Tart is its versatility! Once you’ve mastered the classic version, feel free to have some fun and switch things up a bit. Here are some delightful variations that you can try:
Spiced Up: Add a pinch of nutmeg or allspice to the apple filling for a warm, aromatic twist. It’s like wrapping your tart in a cozy blanket of spices!
Nutty Delight: Sprinkle chopped nuts like walnuts or pecans over the apple layer before baking. They’ll add a fantastic crunch and a rich flavor that complements the apples beautifully.
Caramel Drizzle: Drizzle some caramel sauce over the apples before baking for an indulgent touch. The caramel will melt into the tart, creating pockets of sweet goodness.
Fruit Fusion: Mix in some thinly sliced pears or berries with the apples for a fruity medley. The combination of flavors will elevate your tart to new heights!
Chocolate Twist: For the chocolate lovers, add some chocolate shavings or cocoa powder to the apple mixture. It’s a decadent surprise that pairs surprisingly well with the tartness of the apples.
Citrus Burst: Swap out the lemon juice for orange juice and add some orange zest for a refreshing twist. The citrus notes will brighten up the filling and add a lovely fragrance!
These variations are just the beginning! Don’t hesitate to let your creativity shine and make this French Apple Tart your own. Happy experimenting!
Serving Suggestions
Now that you’ve created a stunning French Apple Tart, it’s time to think about how to serve it! The right accompaniments can elevate your dessert to a whole new level. Here are some of my favorite ideas that will perfectly complement the flavors of your tart:
Vanilla Ice Cream: A classic pairing! The creamy, cold vanilla ice cream contrasts beautifully with the warm tart, creating a delightful harmony of temperatures and textures. Trust me, it’s a match made in dessert heaven!
Whipped Cream: Light and fluffy whipped cream adds a touch of elegance. You can even sweeten it with a hint of vanilla or a sprinkle of cinnamon for extra flavor. Just dollop it generously on top of each slice!
Custard Sauce: A silky custard sauce drizzled over the tart takes it up a notch. The rich, creamy texture pairs wonderfully with the tender apples. You can make it from scratch or use a store-bought version for convenience.
Caramel Sauce: For a decadent twist, drizzle some warm caramel sauce over each slice. The sweet, buttery flavor of the caramel enhances the tart’s sweetness and adds a lovely shine!
Fresh Berries: Serve your tart with a side of fresh berries like raspberries or strawberries. The tartness of the berries balances the sweetness of the apples and adds a pop of color to your plate!
Tea or Coffee: Don’t forget about beverages! A nice cup of tea or coffee can be the perfect finish to your dessert experience. The warm flavors and aromas complement the tart wonderfully.
These serving suggestions will not only enhance the flavors of your French Apple Tart but also create a delightful dining experience that everyone will remember. Enjoy the deliciousness!
Storage & Reheating Instructions
Once you’ve enjoyed your French Apple Tart, you might find yourself with some delicious leftovers. No worries! Proper storage will keep it fresh and tasty for days. Here’s how to do it:
Storing: Let your tart cool completely before storing it. Cover it loosely with plastic wrap or aluminum foil to protect it from drying out. You can keep it at room temperature for up to 2 days, but if you want it to last longer, pop it in the fridge where it’ll stay fresh for up to a week.
Freezing: If you want to enjoy your tart later, you can freeze it! Just wrap it tightly in plastic wrap and then in aluminum foil to prevent freezer burn. It can last up to 2 months in the freezer. When you’re ready to enjoy it, let it thaw overnight in the refrigerator.
Reheating: To reheat, preheat your oven to 350°F (175°C). Place the tart on a baking sheet and cover it loosely with aluminum foil to prevent over-browning. Heat for about 10-15 minutes, or until warmed through. This will help retain that lovely, flaky crust and keep the apples nice and tender.
With these storage and reheating tips, you can savor every last bite of your French Apple Tart without losing any of that delightful flavor or texture. Enjoy your delicious creation, and don’t be surprised if it disappears quickly!
Nutritional Information Section
When it comes to enjoying your delicious French Apple Tart, it’s always nice to be aware of the nutritional content! Keep in mind that nutrition values can vary based on the specific ingredients and brands you use, so these are just typical values for one slice of the tart:
Calories: 250
Total Fat: 10g
Saturated Fat: 5g
Unsaturated Fat: 3g
Trans Fat: 0g
Cholesterol: 30mg
Sodium: 150mg
Total Carbohydrates: 38g
Fiber: 2g
Sugars: 15g
Protein: 2g
This French Apple Tart is a delightful indulgence, and with every bite, you can enjoy the comforting flavors while keeping an eye on your nutrition. Just remember, it’s all about balance, so savor this classic treat in moderation and enjoy every moment!
FAQ Section
Can I use different types of apples for my French Apple Tart? Absolutely! I recommend using a mix of sweet and tart apples for the best flavor. Some great combinations are Granny Smith with Honeycrisp or Fuji apples. This blend will give your tart a lovely depth of flavor!
How do I know when my tart is done baking? Keep an eye on it! Your French Apple Tart is ready when the apples are tender and the crust is golden brown. You might also smell that delicious aroma wafting through your kitchen—trust your senses!
Can I make the crust ahead of time? Yes, you can! Feel free to prepare the pie crust in advance. Just wrap it tightly in plastic wrap and keep it in the fridge for a day or two. It’s a great way to save time when you’re ready to bake!
What can I do if my apples start to brown before I bake? Don’t worry if this happens! Just toss the sliced apples with a little lemon juice as you prep them. It not only prevents browning but also enhances the flavor of your French Apple Tart!
Can I serve my French Apple Tart warm or cold? Both options are delightful! You can serve it warm for that comforting, fresh-out-of-the-oven experience, or let it cool to room temperature for a more traditional dessert vibe. Either way, it’s going to be delicious!
I share easy, flavorful recipes that make home cooking simple, fun, and totally satisfying. Let's get in the kitchen and create something delicious together!


What do you think?
Share your thoughts, tips, or variations on this recipe!