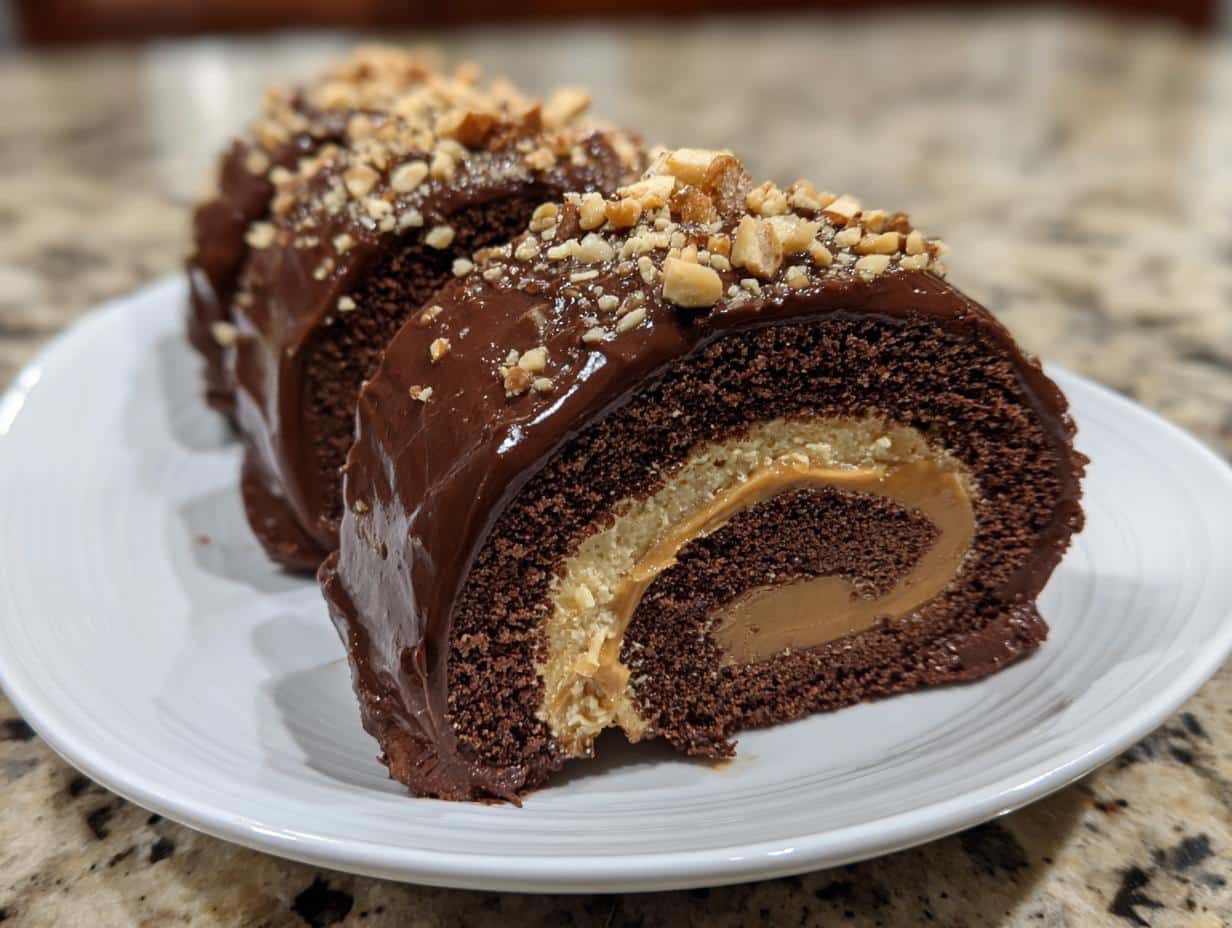
Oh my goodness, if you’re a fan of chocolate and peanut butter, then you are in for a serious treat with this Peanut Butter Cup Chocolate Roll Recipe! It’s like a glorious love affair between two classic flavors that just works so well together. I remember the first time I made this—my kitchen smelled like a candy shop, and I couldn’t wait to dive in! This dessert is not only indulgent but also super easy to whip up, making it perfect for last-minute cravings or special occasions. Just imagine slicing through that rich, chocolate-covered log to reveal the creamy peanut butter filling inside. Trust me, every bite is a moment of pure bliss that’ll keep you coming back for more!
Ingredients for Peanut Butter Cup Chocolate Roll Recipe
Gather these simple ingredients to create a decadent Peanut Butter Cup Chocolate Roll that will have everyone asking for seconds!
1 cup creamy peanut butter: Go for the creamy variety for that smooth texture that spreads like a dream.
1 cup powdered sugar: This adds sweetness and helps bind the filling into a luscious mixture.
1/2 cup unsweetened cocoa powder: This gives the roll its rich chocolate flavor—don’t skimp on quality!
1/4 cup butter (softened): Make sure it’s softened to room temperature for easy mixing.
1 cup chocolate chips: These will coat the roll, so choose your favorite type—dark, milk, or even white chocolate!
1 teaspoon vanilla extract: A splash of vanilla adds warmth and depth to the flavors.
1/4 cup milk: Use this to help melt the chocolate chips into a smooth coating.
How to Prepare the Peanut Butter Cup Chocolate Roll Recipe
Ready to dive into the world of chocolatey, peanut buttery bliss? Let’s do this! Follow these simple steps, and you’ll have a delightful dessert that’ll steal the show at any gathering!
In a large mixing bowl, combine the creamy peanut butter and powdered sugar. Trust me, using an electric mixer here makes it so much easier—mix until it’s smooth and creamy!
Next, add in the unsweetened cocoa powder and softened butter. Blend everything together until it’s well combined; you want a rich, thick texture that you can spread.
Now, grab a parchment paper-lined baking sheet and spread the peanut butter mixture evenly across the surface. Don’t worry about making it perfect; just aim for an even layer!
Time to roll! Starting at one end, carefully roll the mixture into a log shape. It’s okay if it isn’t perfect; the chocolate will cover any imperfections!
Pop that roll into the refrigerator for about an hour to chill. This step is crucial for helping it maintain its shape.
While it chills, melt the chocolate chips with the milk in the microwave. Stir every 30 seconds until it’s smooth and glossy.
Once the roll is chilled, dip it into the melted chocolate, covering it completely. Place it back in the fridge for another 30 minutes to set before slicing!
Nutritional Information
Here’s a quick look at the nutritional values for each slice of this Peanut Butter Cup Chocolate Roll. Keep in mind that these are estimates and can vary based on specific brands or ingredients used:
Calories: 200
Fat: 12g
Protein: 4g
Carbohydrates: 22g
Sugar: 10g
Sodium: 50mg
Why You’ll Love This Recipe
It’s a no-bake dessert, so you can whip it up in no time—perfect for those last-minute cravings!
The combination of creamy peanut butter and rich chocolate is absolutely irresistible.
This recipe is incredibly versatile, making it great for celebrations, potlucks, or just a cozy night in.
Each slice is a delightful indulgence that feels fancy but is super easy to make—your friends and family will be impressed!
It’s customizable, so you can add your favorite toppings or mix-ins to make it your own.
Tips for Success
Here are some of my favorite pro tips to ensure your Peanut Butter Cup Chocolate Roll turns out perfectly every time! First, make sure your peanut butter is at room temperature; it mixes much easier when it’s not cold. If you find the mixture too thick to spread, you can add a splash more milk to help it along. When rolling, don’t stress if it cracks a bit—just gently press it back together, and the chocolate coating will hide most imperfections! Lastly, let the chocolate set completely in the fridge; this extra time will make slicing so much easier and cleaner. Enjoy your delicious creation!
Variations to Try
If you’re feeling adventurous, there are so many fun ways to mix up this Peanut Butter Cup Chocolate Roll! For a fruity twist, try adding some crushed raspberries or sliced strawberries into the peanut butter mixture before rolling. You could also fold in some crunchy pretzels for a sweet-and-salty kick—yum! If you love a little extra texture, sprinkle crushed nuts on the outside before the chocolate sets. Want to amp up the chocolate flavor? Use chocolate peanut butter instead of regular peanut butter, or drizzle some melted white chocolate on top for a stunning presentation. The possibilities are endless!
Storage & Reheating Instructions
To keep your Peanut Butter Cup Chocolate Roll fresh, store any leftovers in an airtight container in the refrigerator for up to a week. If you want to enjoy it later, you can freeze slices wrapped in plastic wrap for up to two months. No reheating needed—just serve chilled and enjoy!
FAQ Section
Can I use crunchy peanut butter instead of creamy? Absolutely! Crunchy peanut butter will add a delightful texture to your Peanut Butter Cup Chocolate Roll, just keep in mind it might be a bit less smooth.
How long can I store this roll? You can keep your roll in an airtight container in the fridge for up to a week, or freeze slices for up to two months for later enjoyment.
Can I make this roll ahead of time? Yes! It’s actually perfect for preparing a day in advance. Just let it chill overnight for best results.
What can I use instead of chocolate chips? If you prefer, you can use chocolate bars chopped into pieces or even carob chips for a different flavor.
Is this recipe suitable for vegans? To make it vegan, substitute the butter with a plant-based alternative and use dairy-free chocolate chips!
I share easy, flavorful recipes that make home cooking simple, fun, and totally satisfying. Let's get in the kitchen and create something delicious together!


What do you think?
Share your thoughts, tips, or variations on this recipe!