If you’ve ever torn into a crispy, chewy loaf of Italian bread and wondered how to make it yourself, you’re in the right place. This Ciabatta Bread Recipe will guide you through everything you need to know—from understanding what makes ciabatta different from other breads, to crafting a bakery-style loaf right in your kitchen. We’ll break down the science of the open crumb, explore which flour gives the best flavor, and troubleshoot common problems like flat loaves and overly sticky dough.
Whether you’re baking for the first time or want to upgrade your skills, this guide brings you pro tips and simple steps. Learn more about fluffy dessert recipes with our Lemon Poppy Seed Pudding Cake that pair perfectly with a slice of fresh ciabatta!
What is Ciabatta Bread?
History and Origin of Ciabatta Bread
Ciabatta, which means “slipper” in Italian (due to its shape), is a relatively modern creation in the bread world. It was developed in 1982 by a baker in Verona, Italy, as a response to the increasing popularity of French baguettes. While traditional Italian breads like focaccia have been around for centuries, ciabatta was designed to be airy, chewy, and ideal for paninis.
What sets it apart is its high-hydration dough, which creates an open crumb (the airy holes you see when sliced). Ciabatta quickly gained global recognition for its rustic charm, chewy bite, and crusty shell.
While ciabatta and white bread may look similar in color, they couldn’t be more different in structure and preparation. The key differences include:
Feature
Ciabatta Bread
Traditional Bread
Hydration
High (up to 80%)
Moderate (50–60%)
Texture
Chewy with large air pockets
Soft and uniform
Crust
Crispy and golden
Soft or slightly crisp
Flavor
Mildly tangy, rustic
Sweet or neutral
Shape
Flat, elongated
Rounded or loaf
The use of strong bread flour, combined with long fermentation, creates that signature chewiness and flavor. Traditional breads often skip this, resulting in a denser, more uniform texture.
Also, ciabatta’s lack of shaping and minimal kneading makes it a go-to for artisan bakers and home cooks alike who want a no-fuss rustic loaf.
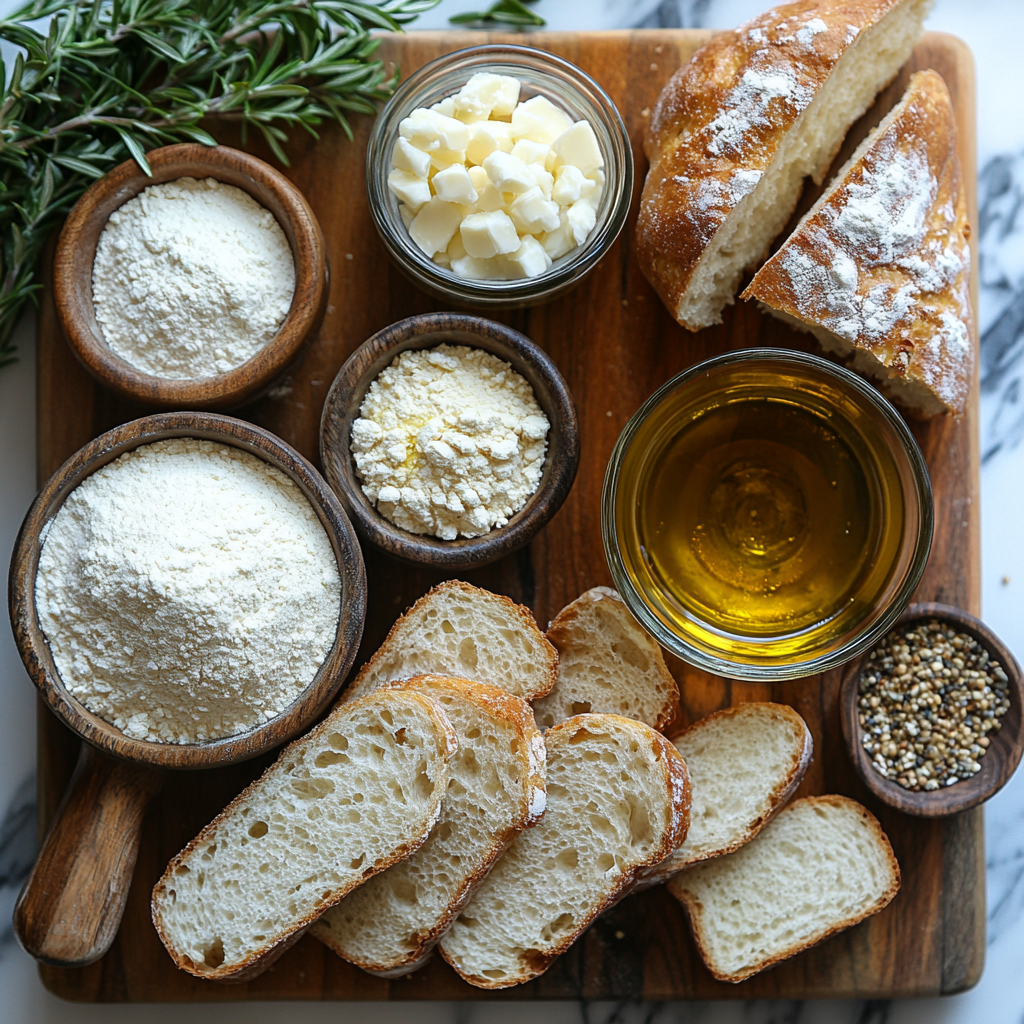
Key Ingredients in a Ciabatta Bread Recipe
What Flour is Best for Ciabatta?
The flour you choose is the backbone of a great ciabatta bread recipe. Because ciabatta is known for its chewy texture and large air pockets, the ideal flour should have high protein content to develop strong gluten. That means:
Bread Flour (11.5%–13% protein): Best choice. Its strength holds the wet dough structure, creating those signature holes.
All-Purpose Flour (10%–11% protein): Acceptable substitute, but may result in a slightly flatter and less airy loaf.
00 Flour (Italian style): Fine texture but lower strength; better for pizza than ciabatta.
Here’s a quick comparison table:
Flour Type
Protein %
Result in Ciabatta
Bread Flour
12.5%
Best rise, chewy texture, open crumb
All-Purpose
10.5%
Acceptable rise, softer texture
Whole Wheat
13–14%
Heavier, denser crumb
00 Flour
9%
Softer crust, less structure
Key Note: High hydration makes the dough sticky and tricky, but it’s what gives ciabatta its airy texture and crispy exterior. Don’t add extra flour—use a dough scraper and wet hands instead.
Looking for inspiration? Try our savory Quick One-Pot Chicken and Rice Dinner alongside warm ciabatta to soak up the juices—it’s the perfect pairing.
Step-by-Step Ciabatta Bread Recipe
Essential Tools You’ll Need
Before we dive into the actual recipe, make sure you have the right tools on hand. Ciabatta dough is very wet and sticky, so having the proper equipment helps you avoid frustration and makes the process much smoother.
Here’s what you’ll need:
Tool
Purpose
Mixing Bowl
Large enough to accommodate dough expansion
Kitchen Scale
For precise flour and water ratios
Bench Scraper
Essential for handling sticky dough
Stand Mixer (optional)
Helpful but not required
Proofing Container
Clear tub or bowl to monitor fermentation
Parchment Paper
Prevents sticking when transferring to oven
Baking Stone or Steel
Helps create a crispy crust
Spray Bottle
For steaming the oven during baking
Using quality tools enhances your results. Ciabatta may look rustic, but it requires precision to get that artisan-style finish.
Easy Instructions for Making Authentic Ciabatta at Home
This ciabatta bread recipe is a no-knead, slow-rise method that uses time and fermentation to build flavor and texture. Here’s a basic breakdown:
Ingredients:
500g Bread flour
400g Water (80% hydration)
10g Salt
1g Instant yeast
10g Olive oil (optional)
Instructions:
1. Mix the Dough Combine flour, yeast, and water in a large bowl. Mix until shaggy and no dry bits remain. Cover and let rest for 30 minutes (autolyse).
2. Add Salt & Oil Add salt (and olive oil if using), mix gently until incorporated. Dough will be sticky—that’s good!
3. Stretch and Fold (3x) Every 30 minutes, perform a stretch-and-fold in the bowl. Do this 3 times to strengthen gluten without kneading.
4. Bulk Fermentation Let dough rise for 2–3 hours at room temperature until doubled in size. You’ll see bubbles forming.
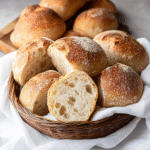
5. Shape the Dough Dust your surface generously with flour. Gently turn dough out. Divide in half. Shape loosely into long rectangles. Avoid degassing!
6. Final Proof Let the shaped loaves rest on parchment paper for 45–60 minutes. They’ll puff up slightly.
7. Bake at High Heat Preheat oven to 475°F (245°C) with a baking stone inside. Slide parchment with loaves onto the stone. Spray inside the oven for steam.
8. Bake Time Bake for 20–25 minutes until golden brown and hollow-sounding when tapped.
9. Cool Before Cutting Let ciabatta cool on a wire rack for 30–45 minutes. Cutting too soon ruins the crumb.
Don’t miss our nostalgic Old-Fashioned Chocolate Mayonnaise Cake to enjoy with a slice of fresh-baked ciabatta and coffee—it’s a hearty breakfast or brunch idea.
Secrets Behind Ciabatta’s Flavor and Texture
What Gives Ciabatta Bread its Unique Flavor?
The magic behind ciabatta’s bold, rustic flavor doesn’t lie in a long list of ingredients—but in time, fermentation, and technique.
Here are the main contributors to that classic flavor:
Long Fermentation: Letting the dough ferment for several hours (or overnight in the fridge) helps develop complex sour and nutty notes without needing a sourdough starter.
High-Hydration Dough: The extra water allows for enzymatic activity, unlocking sugars from the flour that enhance taste and browning.
Minimal Handling: By avoiding over-mixing and kneading, you retain the natural flavors of the flour and yeast.
Olive Oil (Optional): Though not always traditional, some recipes add a hint of olive oil for a richer, savory undertone.
Flavor tip: Want a deeper tang? Try a preferment method like poolish (equal parts flour and water fermented with a pinch of yeast overnight). It boosts aroma and structure.
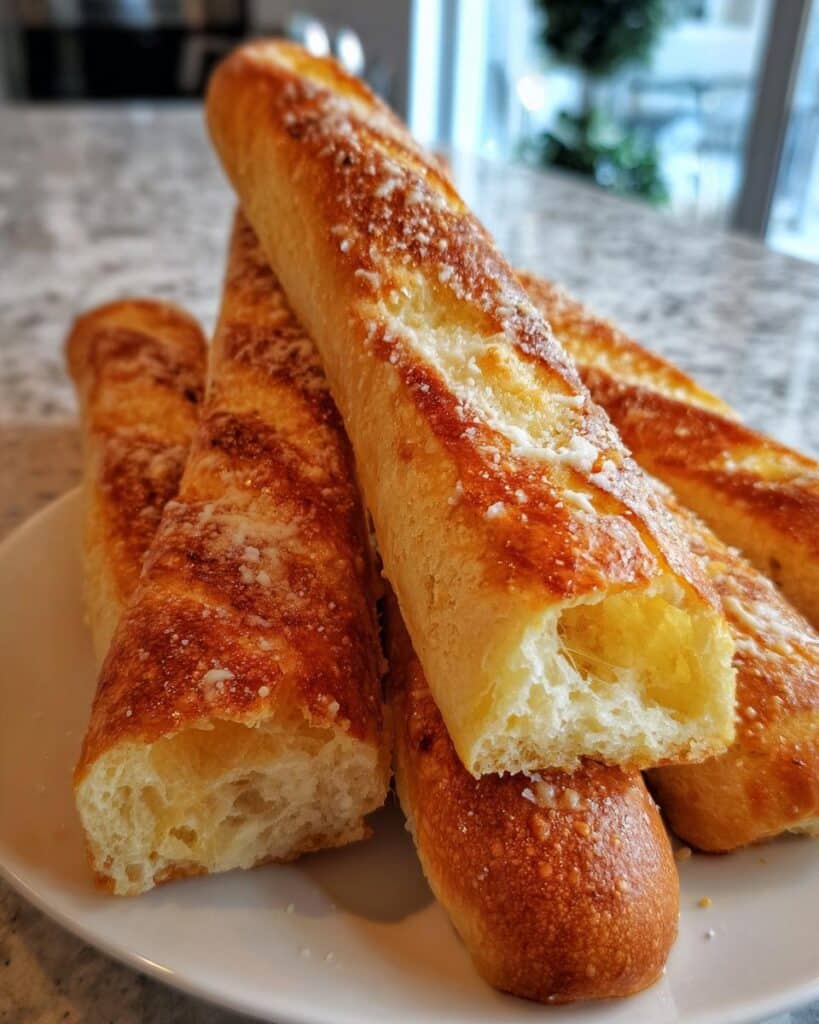
The Science of Ciabatta’s Open Crumb and Crispy Crust
Ciabatta’s airy interior and crunchy crust make it instantly recognizable on any bakery shelf. Here’s how that happens:
Open Crumb (those big holes):
Created by gentle shaping, high hydration, and minimal degassing.
Over-kneading destroys the gas pockets; let the dough do the work.
Crispy, Crackling Crust:
Achieved with a hot oven and plenty of steam during the first few minutes of baking.
Using a baking stone or steel helps radiate heat from below, giving you that bakery-style finish.
Here’s a visual breakdown:
Texture Element
What Causes It
Open crumb
High water content + long rest time
Crisp crust
High heat + steam in oven
Chewy bite
Strong gluten network from bread flour
Bold flavor
Fermentation + optional oil
Don’t miss our decadent Peach Cobbler with Crumble Topping to serve alongside warm slices of ciabatta—perfect for a sweet-salty brunch spread.
Variations and Twists on the Classic Ciabatta Recipe
Whole Wheat and Gluten-Free Ciabatta Options
If you love the taste and texture of ciabatta but need something more tailored to your diet, don’t worry—there are tasty options for whole grain and gluten-free eaters too.
Whole Wheat Ciabatta
Swapping out 30–50% of the bread flour for whole wheat flour adds fiber and a nutty depth to your loaf. Just keep in mind:
Whole wheat absorbs more water—increase hydration slightly to keep it soft.
Let it rest longer; bran particles can interfere with gluten development.
Flavor tip: Add a teaspoon of honey or molasses to round out the earthy flavor of whole wheat.
Gluten-Free Ciabatta
Yes, it’s possible! Gluten-free baking requires a totally different structure, so look for these in your ingredient list:
Gluten-free all-purpose flour (with xanthan gum or guar gum)
Psyllium husk: Helps hold shape and moisture
Higher hydration and starches: Like tapioca or potato starch for a softer bite
Expect a denser crumb, but you can still get that rustic crust and chewy inside with the right recipe.
Add-Ins: Herbs, Garlic, Cheese, and More
Ciabatta’s simple flavor makes it the perfect canvas for flavor experimentation. Here are some delicious combinations to try:
Add-In
How to Use
Rosemary + Sea Salt
Mix chopped rosemary into the dough or sprinkle on top before baking
Roasted Garlic
Fold whole roasted cloves into the final shaping stage
Sun-Dried Tomatoes + Basil
Adds a Mediterranean twist; best folded in after first rise
Shredded Parmesan
Mix into dough or sprinkle over crust before baking
Black Olives + Oregano
Salty, savory, and perfect for antipasto platters
These mix-ins not only elevate your ciabatta bread recipe but also make each loaf unique. They’re perfect for gifting, sandwiches, or snacking straight from the oven.
Check out our Whipped Cream Pound Cake for a soft, sweet contrast to your savory ciabatta creations.
Common Mistakes and Troubleshooting Tips
Why is My Ciabatta Flat or Dense?
One of the most frustrating issues when baking ciabatta is ending up with a flat or dense loaf. But don’t worry—it’s fixable.
Here are the top reasons this happens and how to avoid them:
Problem
Cause
Solution
Flat Ciabatta
Over-proofed or mishandled dough
Shorten final rise, handle dough gently
Dense Texture
Under-proofed dough or low hydration
Give enough time to ferment; aim for 75–80% hydration
Collapsed Loaf
Too much handling during shaping
Avoid pressing or kneading the dough after rise
No Air Pockets
Too much flour or over-kneading
Stick to recipe hydration and use the “stretch and fold” method instead of kneading
Pro Tip: Always use a kitchen scale. Even slight differences in flour and water weight can drastically impact hydration, texture, and rise.
Fixing Dough That’s Too Wet or Too Dry
Because ciabatta dough is so high in hydration, many beginners panic and add more flour. But don’t!
Too Wet?
Don’t add flour! Instead, wet your hands when handling it.
Use a bench scraper to fold and lift.
Chill the dough in the fridge for 20 minutes—it firms up for easier shaping.
Too Dry?
Check your flour type—bread flour absorbs more water than all-purpose.
Add small amounts of water (1 tbsp at a time) and let the dough rest.
Cover tightly to prevent moisture loss during rising.
Baking ciabatta takes practice. The dough will feel different from typical breads—but that’s what gives you those giant air pockets and crispy crusts.
Best Ways to Eat Ciabatta (Sandwiches, Bruschetta, etc.)
Ciabatta isn’t just a looker—it’s also one of the most versatile breads you can serve. Its chewy texture and porous interior make it perfect for soaking up sauces or building hearty bites. Here are some all-time favorite ways to use ciabatta:
Use
How to Serve It
Panini
Slice horizontally, stuff with meat, cheese, and grill for crispy perfection
Bruschetta
Toast slices and top with tomatoes, garlic, basil, and olive oil
Garlic Bread
Spread with butter, minced garlic, parsley, and broil until golden
Soup Sidekick
Serve thick slabs alongside tomato soup or chili
Dipping Bread
Tear and dip into olive oil and balsamic vinegar for a rustic starter
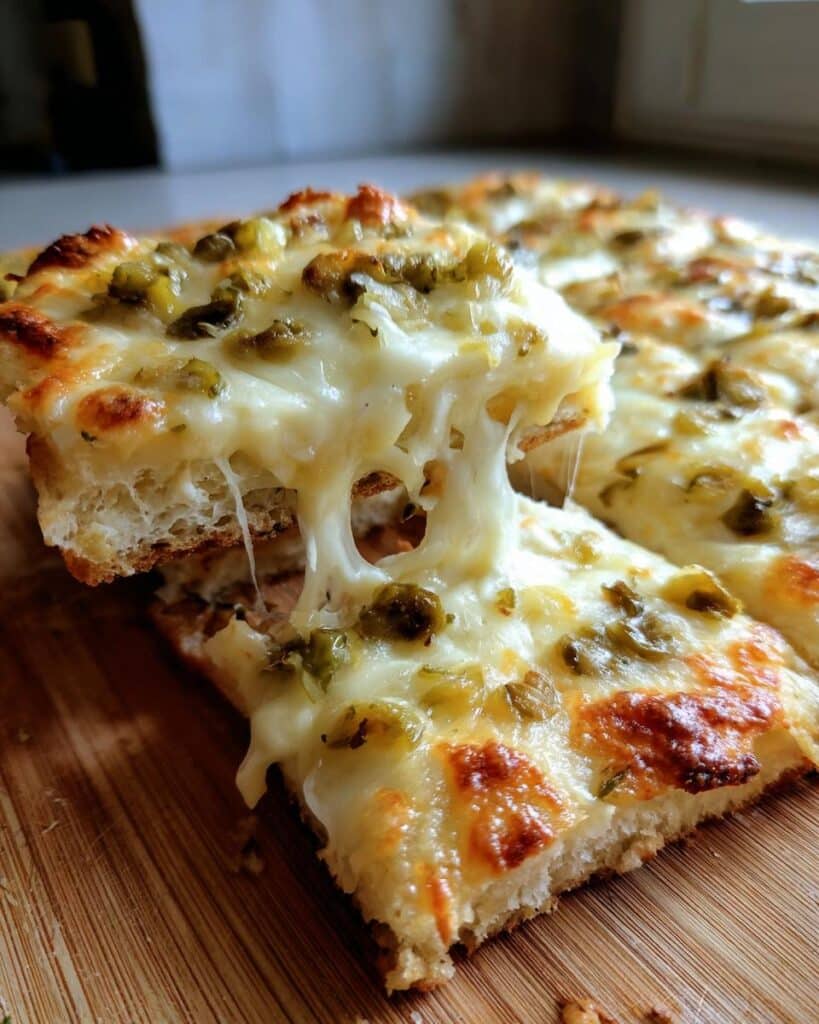
Ciabatta Pizza
Split open and top with sauce, cheese, and bake like flatbread
Whether you’re hosting brunch or prepping lunch, ciabatta elevates every dish it touches. Its sturdy crumb doesn’t get soggy easily, making it ideal for sandwiches and spreads.
Storing and Freezing for Long-Term Freshness
Fresh ciabatta tastes best the day it’s baked—but that doesn’t mean you can’t save it for later.
Short-Term Storage (1–2 Days)
Wrap your loaf in a paper bag or clean kitchen towel to preserve the crust.
Avoid plastic—it traps moisture and softens the crust.
Freezing Instructions
Slice the loaf before freezing for easy thawing.
Wrap tightly in foil or freezer-safe plastic wrap, then place in a freezer bag.
Use within 3 months for best flavor.
Reheating Tips
To restore crispness, pop slices in a 375°F oven for 5–7 minutes.
Avoid microwaving—it ruins the crust.
Want to complete your meal? Discover great ideas like our Homemade Lemon Poppy Seed Pudding Cake —a light, zesty finish after your ciabatta-based dinner.
Is Ciabatta Healthier Than Other Breads?
Nutritional Breakdown of Ciabatta Bread
When it comes to health, ciabatta sits somewhere between indulgent and balanced. It’s not a diet food—but it’s not junk either. Understanding what’s in a standard loaf helps you decide how it fits into your lifestyle.
Here’s a quick nutrition snapshot per 100g (about 2 slices):
Nutrient
Amount
Calories
260–280 kcal
Carbohydrates
52g
Protein
8–10g
Fat
1–2g
Fiber
2g
Sodium
450mg (depending on salt used)
Key nutritional traits:
Low fat and no added sugar (unless using add-ins)
Good protein content if using bread flour
Moderate sodium, adjustable depending on your recipe
Contains refined carbs, but can be partially swapped for whole wheat for added fiber
Comparing Ciabatta to Sourdough, Baguette, and White Bread
Let’s see how ciabatta stacks up against some of its bakery cousins:
Bread Type
Texture
Calories (per 100g)
Digestibility
Fiber
Ciabatta
Chewy, airy
260–280
Moderate
2g
Sourdough
Chewy, tangy
230–250
Easier (natural ferment)
2–3g
Baguette
Crusty, light
270–290
Fast-digesting
1.5g
White Bread
Soft, dense
240–260
Fast-digesting
1g
Is ciabatta healthier than white bread? Yes, especially if made at home. It often has fewer additives, no preservatives, and can be adjusted for salt and flour quality.
Is it better than sourdough? Not necessarily. Sourdough’s wild fermentation may offer digestive benefits and lower glycemic index. But if you’re after a heartier sandwich base or crave that rustic chew, ciabatta is still a strong, clean choice.
Rustic, chewy, and full of flavor—this homemade ciabatta bread recipe gives you the perfect airy crumb and crispy crust, just like a bakery loaf.
Ingredients
Scale
500g Bread flour
400g Water (80% hydration)
10g Salt
1g Instant yeast
10g Olive oil (optional)
Instructions
Combine flour, yeast, and water in a large bowl. Mix until shaggy and no dry bits remain. Cover and let rest for 30 minutes (autolyse).
Add salt and olive oil (if using), then mix gently to incorporate. Dough will be sticky.
Perform a stretch-and-fold in the bowl every 30 minutes, 3 times total.
Let dough rise for 2–3 hours at room temperature until doubled in size with visible bubbles.
Flour surface generously, divide dough in half, and gently shape into long rectangles. Do not degas.
Let shaped loaves rest on parchment paper for 45–60 minutes.
Preheat oven to 475°F (245°C) with a baking stone inside. Transfer loaves on parchment to the stone. Spray oven with water to create steam.
Bake for 20–25 minutes until golden and sounds hollow when tapped.
Cool on a wire rack for at least 30–45 minutes before slicing.
Notes
Use bread flour for the best open crumb and chewy texture. High hydration dough will be sticky—use a dough scraper and wet hands to manage it.
Prep Time:25 minutes
Cook Time:25 minutes
Category:Bread
Method:Baked
Cuisine:Italian
Keywords: ciabatta, bread, artisan bread, Italian bread, homemade ciabatta
FAQ – Ciabatta Bread Recipe
What Makes Ciabatta Different from Bread?
Ciabatta stands out due to its high hydration dough, which gives it a chewy, airy interior and crisp, golden crust. Unlike traditional sandwich bread, ciabatta is shaped freely, with no loaf pans or strict molds. It also has a more rustic, artisan look, often with irregular holes throughout the crumb. Traditional white bread is usually softer, denser, and more uniform.
Is Ciabatta Healthier Than Bread?
That depends on what you’re comparing it to. Compared to white sandwich bread loaded with preservatives or sugar, ciabatta is healthier, especially if made at home. It contains fewer ingredients, no artificial additives, and has more protein and fiber when made with quality flour. However, sourdough may still beat it in digestibility due to natural fermentation.
What Flour is Best for Ciabatta?
The best flour for an authentic ciabatta bread recipe is bread flour, which typically contains 11.5% to 13% protein. This higher protein level helps build strong gluten networks, which are essential for supporting the dough’s high hydration and maintaining its signature open crumb structure. All-purpose flour can work, but your crumb might be tighter and less chewy.
What Gives Ciabatta Bread Its Flavor?
Ciabatta gets its flavor from:
Long fermentation, which develops mild tanginess and complexity
High hydration, which unlocks more sugar from the flour for natural sweetness
Optional olive oil, which adds richness and enhances aroma Some bakers use a preferment (like poolish) to develop even more flavor before mixing the main dough.
This concludes our deep dive into the ciabatta bread recipe. Whether you’re baking for a family dinner or looking to master artisan techniques at home, this guide helps you bake a rustic Italian loaf full of flavor, texture, and pride.
Conclusion: Master the Art of the Ciabatta Bread Recipe
Now you have all the tools, techniques, and knowledge to bake the perfect ciabatta bread at home. From choosing the right flour to understanding fermentation, hydration, and shaping—this guide takes you step-by-step through a foolproof, bakery-quality experience.
Ciabatta may look fancy, but it’s surprisingly simple once you understand its core components. With some patience, high-quality ingredients, and a little practice, you’ll be pulling rustic, golden loaves from your oven that rival the best Italian bakeries.
I share easy, flavorful recipes that make home cooking simple, fun, and totally satisfying. Let's get in the kitchen and create something delicious together!


What do you think?
Share your thoughts, tips, or variations on this recipe!