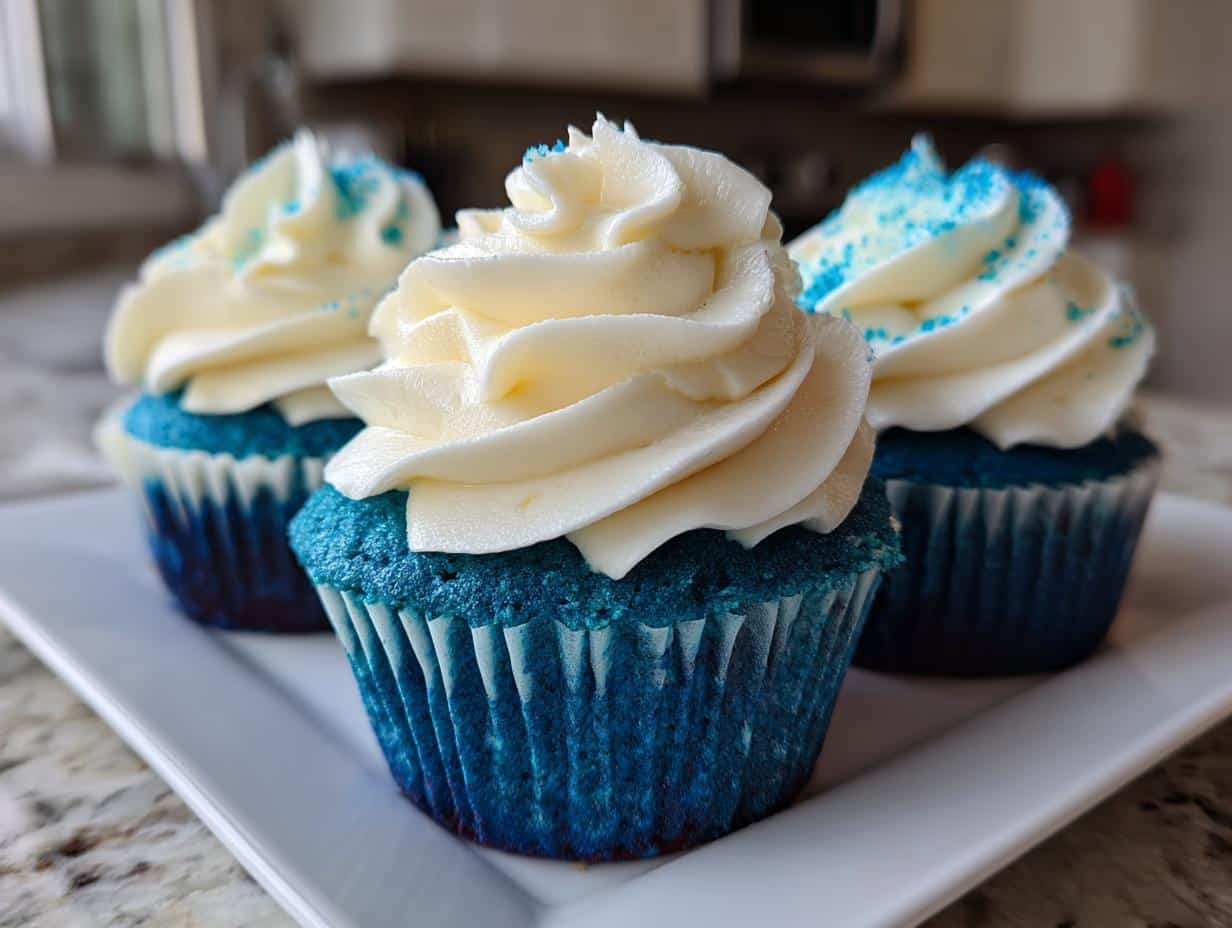
Oh my goodness, let me tell you about these *Blue Velvet Cupcakes*! They’re not just a treat for your taste buds, but a feast for the eyes too! Imagine pulling out a tray of these stunning cupcakes, their deep blue hue just begging to be devoured. I first stumbled upon this recipe at a friend’s birthday party, and I was *hooked*—the moist cake combined with that silky cream cheese frosting is pure bliss. The best part? They’re surprisingly easy to whip up! Whether you’re celebrating a special occasion or just want to brighten your day with something sweet, these Blue Velvet Cupcakes will definitely make an impression. Trust me, once you take that first bite, you’ll be dreaming about them for days!
Ingredients for Blue Velvet Cupcakes
(Tip: You’ll find the full list of ingredients and measurements in the recipe card below.)
1 1/2 cups all-purpose flour: This is the base of your cupcakes, giving them that lovely structure.
1 cup granulated sugar: Sweetens the cupcakes and helps create that soft, moist texture.
1/2 cup unsweetened cocoa powder: Adds a subtle chocolate flavor that pairs perfectly with the blue hue.
1 teaspoon baking powder: This is your leavening agent to help the cupcakes rise beautifully.
1/2 teaspoon baking soda: Works alongside the baking powder for an extra lift!
1/2 teaspoon salt: Just a pinch to balance all that sweetness and enhance the flavors.
1 cup vegetable oil: Keeps these cupcakes moist and tender—trust me, you don’t want to skimp on this!
1 cup buttermilk: Adds richness and a slight tang that makes the cupcakes extra delicious.
2 large eggs: These bind everything together and help with the rise.
1 teaspoon vanilla extract: A must for that warm, sweet aroma and flavor boost.
1 tablespoon blue food coloring: This is what gives these cupcakes their signature stunning blue color!
How to Prepare Blue Velvet Cupcakes
First things first, preheat your oven to 350°F (175°C). This is super important because you want those cupcakes to rise perfectly!
While the oven is heating up, line a muffin tin with your favorite cupcake liners. I love using colorful ones to match the vibrant blue of the cupcakes!
In a large mixing bowl, whisk together the flour, sugar, cocoa powder, baking powder, baking soda, and salt. Make sure it’s well combined so your cupcakes have an even texture.
In another bowl, mix together the vegetable oil, buttermilk, eggs, vanilla extract, and blue food coloring. Oh wow, this is where that beautiful color really comes to life!
Now, pour the wet ingredients into the dry ingredients. Mix them gently until everything is just combined—don’t overmix! You want a smooth batter without any lumps.
Next, carefully fill each cupcake liner about two-thirds full with the batter. This gives them room to rise without overflowing.
Pop those beauties into the oven and bake for 20 to 25 minutes. You’ll know they’re done when a toothpick inserted into the center comes out clean. Try not to open the oven door too soon; we don’t want any sad, sunken cupcakes!
Once they’re done, let the cupcakes cool in the tin for about 5 minutes, then transfer them to a wire rack to cool completely. This is the hardest part—waiting for them to cool! But trust me, it’s worth it for that perfect frosting.
Why You’ll Love Blue Velvet Cupcakes
Quick Preparation Time: You can whip these up in just about 15 minutes, making them perfect for last-minute celebrations or cravings!
Easy to Make: The steps are straightforward, so even if you’re a beginner in the kitchen, you’ll feel like a pro with these delightful treats.
Stunning Presentation: The vibrant blue color is sure to wow your friends and family—everyone loves a cupcake that looks as good as it tastes!
Delicious Flavor: The combination of rich cocoa and creamy frosting creates a mouthwatering experience that you won’t forget.
Perfectly Moist Texture: Thanks to the buttermilk and vegetable oil, these cupcakes are incredibly moist and tender, making each bite heavenly.
Customizable: You can easily tweak the frosting or add sprinkles to make them your own—endless possibilities for fun!
Tips for Success with Blue Velvet Cupcakes
Okay, let’s make sure your Blue Velvet Cupcakes turn out *amazing*! Here are some of my top tips to help you nail this recipe:
Use Room Temperature Ingredients: Bring your eggs and buttermilk to room temperature before mixing. This helps the batter come together smoothly and ensures even baking.
Measure Your Flour Correctly: Scoop your flour into the measuring cup and level it off with a knife. Don’t scoop directly from the bag, or you might end up with too much flour, which can lead to dense cupcakes!
Don’t Overmix the Batter: Mix just until combined! Overmixing can lead to tough cupcakes, and we definitely want them soft and tender. A few lumps are perfectly fine.
Check for Doneness Early: Start checking your cupcakes around the 20-minute mark. Ovens can vary, and you don’t want to overbake them. A toothpick should come out clean or with a few moist crumbs.
Cool Completely Before Frosting: I know it’s tempting to frost while they’re still warm, but trust me—waiting until they cool completely will prevent your frosting from melting and sliding off!
Experiment with Frosting: While cream cheese frosting is a classic pairing, feel free to try a whipped vanilla or even a chocolate ganache for a fun twist!
With these tips in mind, you’ll be well on your way to cupcake perfection. Enjoy the process, and don’t forget to have fun while baking!
Variations of Blue Velvet Cupcakes
If you’re feeling adventurous, there are so many fun ways to mix things up with your Blue Velvet Cupcakes! Here are some of my favorite variations that add a little twist to this classic recipe:
Different Frosting Flavors: While I adore the classic cream cheese frosting, you can switch it up! Try a fluffy vanilla buttercream for a sweeter touch or even a tangy lemon frosting for a zesty surprise!
Chocolate Chip Add-In: For a delightful surprise, fold in some mini chocolate chips into the batter before baking. They melt beautifully and add extra richness to each bite!
Nutty Crunch: Add some chopped nuts, like pecans or walnuts, to the batter for a little crunch and a nutty flavor that complements the cupcake perfectly.
Fun Sprinkles: Dress up your frosted cupcakes with colorful sprinkles or edible glitter for a festive touch. They’re perfect for birthdays or celebrations!
Blueberry Swirl: Fold in some fresh blueberries or blueberry jam into the batter for a fruity twist. The combination of blueberry and chocolate is simply divine!
Seasonal Spices: Add a pinch of cinnamon or nutmeg to the batter for a warm spice note. It’s a cozy option perfect for the fall season!
These variations keep things exciting and allow you to customize the cupcakes to your taste or occasion. Have fun experimenting, and let your creativity shine!
Storage & Reheating Instructions for Blue Velvet Cupcakes
So, you’ve made these delicious Blue Velvet Cupcakes, and now you want to keep them fresh for later! Storing them properly is key to maintaining that moist texture and delightful flavor. Here’s what I do:
Cool Completely: First things first, make sure your cupcakes are completely cooled before storing. This prevents condensation from forming, which can make them soggy.
Airtight Container: Place the cooled cupcakes in an airtight container. If you’ve already frosted them, try to use a container with enough height to avoid squishing the frosting. Alternatively, you can store the cupcakes without frosting and frost them just before serving!
Room Temperature or Refrigerator: You can keep them at room temperature for up to 2 days. If you want to store them longer, pop them in the refrigerator, where they’ll stay fresh for about a week. Just remember, they might dry out a bit in the fridge, so enjoy them as soon as possible!
If you have leftover cupcakes that you want to keep for a longer time, here’s how to freeze them:
Wrap Individually: Wrap each cupcake tightly in plastic wrap or aluminum foil. I like to wrap them individually to make it easier to grab just one when the craving hits!
Freezing: Place the wrapped cupcakes in a freezer-safe bag or container, and they’ll last for up to 2 months in the freezer. Just be sure to label them with the date so you can keep track!
When you’re ready to enjoy a frozen cupcake, simply transfer it to the refrigerator overnight to thaw. You can also let it sit at room temperature for about 30 minutes. If you want to warm it up a bit, pop it in the microwave for about 10-15 seconds. Just be careful not to overheat it—nobody wants a rubbery cupcake!
With these storage tips, you can savor your Blue Velvet Cupcakes for days on end, enjoying that rich flavor and tender texture just as much as when they were freshly baked!
Nutritional Information for Blue Velvet Cupcakes
Now, let’s chat about what’s happening nutritionally with these gorgeous Blue Velvet Cupcakes! Keep in mind that these values are estimates, but they’ll give you a good idea of what to expect when you indulge. Here’s a typical breakdown per cupcake:
Calories: 250
Fat: 10g
Saturated Fat: 2g
Unsaturated Fat: 8g
Trans Fat: 0g
Cholesterol: 30mg
Sodium: 150mg
Carbohydrates: 36g
Fiber: 1g
Sugar: 20g
Protein: 3g
These delightful cupcakes are a sweet treat, and while they’re not health food, they’re certainly worth every delicious bite! Just remember to enjoy them in moderation, and you’ll be all set for a delightful dessert experience!
FAQ About Blue Velvet Cupcakes
Can I use regular food coloring instead of gel? You can, but I really recommend using gel food coloring for a more vibrant color without adding too much liquid to the batter. It gives those Blue Velvet Cupcakes that stunning hue we all love!
What’s the best way to frost these cupcakes? I love using a piping bag with a star tip for a beautiful swirl of cream cheese frosting. But if you don’t have one, just use a spatula to spread it on—every method tastes delicious!
Can I make the batter ahead of time? Absolutely! You can prepare the batter a few hours in advance and keep it covered in the refrigerator. Just give it a gentle stir before filling your cupcake liners when you’re ready to bake.
What if my cupcakes sink in the middle? Oh no! That can happen if the batter is overmixed or if they’re taken out of the oven too soon. Be careful not to overmix, and always test for doneness with a toothpick before pulling them out!
Can I make these cupcakes gluten-free? Yes, you can! Just substitute the all-purpose flour with a 1-to-1 gluten-free baking blend. They’ll still be delicious and beautiful, just like the originals!
Serving Suggestions with Blue Velvet Cupcakes
Now that you’ve baked these stunning Blue Velvet Cupcakes, you might be wondering what to serve alongside them to elevate the experience even more. Here are some delightful ideas that pair beautifully with these cupcakes:
Fresh Berries: Serve your cupcakes with a side of fresh strawberries, blueberries, or raspberries. Their natural tartness complements the sweetness of the cupcakes and adds a pop of color to your plate!
Iced Coffee or Tea: A chilled glass of iced coffee or refreshing iced tea makes for a fantastic beverage pairing. It balances the sweetness and enhances the overall enjoyment of your dessert!
Vanilla Ice Cream: For an indulgent treat, top your cupcakes with a scoop of vanilla ice cream. The creamy texture and cold temperature will take your Blue Velvet experience to a whole new level!
Chocolate Ganache: Drizzle some warm chocolate ganache over your frosted cupcakes for an extra decadent touch. The rich chocolate flavor intertwines beautifully with the cocoa in the cupcakes.
Whipped Cream: A dollop of lightly sweetened whipped cream on top of each cupcake adds a light and airy element that contrasts perfectly with the dense frosting.
Fruit Compote: A spoonful of homemade or store-bought fruit compote, like blueberry or raspberry, can add a delicious fruity twist and is a beautiful way to dress up your cupcakes!
With these serving suggestions, you’ll create a delightful dessert experience that your friends and family will absolutely love. Enjoy every bite and savor the compliments that come your way!
I share easy, flavorful recipes that make home cooking simple, fun, and totally satisfying. Let's get in the kitchen and create something delicious together!


What do you think?
Share your thoughts, tips, or variations on this recipe!