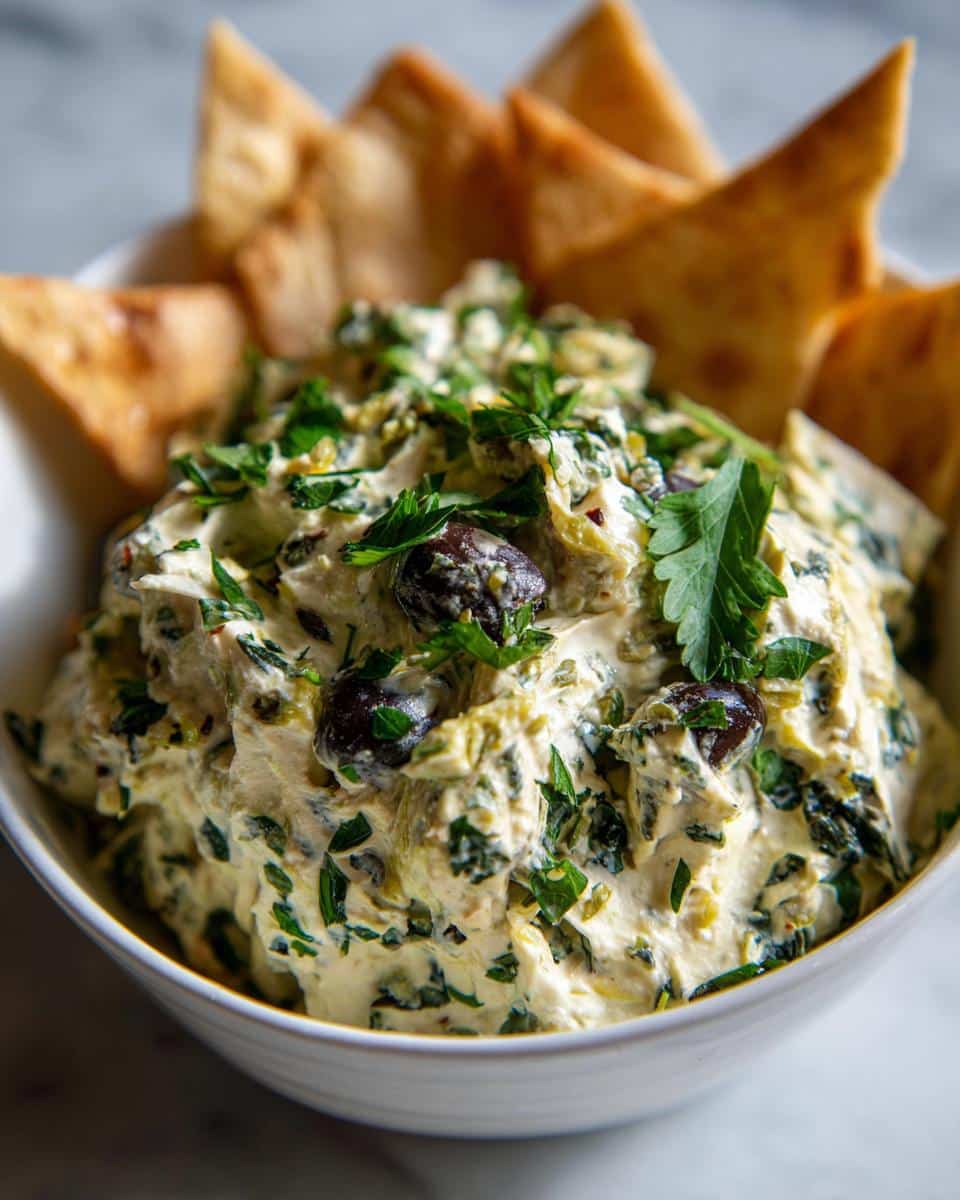
Oh my goodness, let me tell you about my Olive Lovers’ Dream Dip! This dip is an absolute game changer—it’s creamy, flavorful, and bursting with those delightful Mediterranean vibes we all crave. I mean, who can resist the rich, briny goodness of olives? Trust me, whether you’re an olive enthusiast or just dipping your toes into the olive world, this dip is a must-try! It’s perfect for gatherings, parties, or just a cozy night in with friends. Picture this: a luscious dip that pairs beautifully with crunchy pita chips or fresh veggie sticks. It’s like a little party for your taste buds! You won’t believe how easy it is to whip up this creamy delight. Get ready to impress your guests (or just yourself) with this unforgettable appetizer!
Ingredients List
1 cup green olives, pitted
1 cup black olives, pitted
1/2 cup cream cheese, softened
1/4 cup sour cream
2 tablespoons olive oil
2 tablespoons fresh parsley, chopped
1 teaspoon garlic powder
1 teaspoon lemon juice
How to Prepare the Olive Lovers’ Dream Dip
Getting your Olive Lovers’ Dream Dip ready is so easy and fun! Follow these simple steps, and you’ll have a creamy, delicious dip in no time. Trust me, the hardest part is waiting for it to chill before you dig in!
Step 1: Blend the Olives
First things first, let’s get those olives blended! Toss the pitted green and black olives into your food processor. Pulse them until they’re finely chopped but not pureed. You want a nice texture that has a bit of bite to it—think little pieces that will add a wonderful flavor punch to your dip. Wow, the smell of those olives is already heavenly!
Now, it’s time to add in the creamy goodness! To the chopped olives, add the softened cream cheese, sour cream, olive oil, chopped parsley, garlic powder, and lemon juice. Blend everything together until it’s smooth and creamy. You might need to scrape down the sides a couple of times to make sure everything is well mixed. The combination of those ingredients is just divine, and it makes for a dip that’s rich and absolutely irresistible!
Step 3: Adjust Seasoning
Here’s where you can really make this dip your own. Give it a taste and see if it needs a little extra oomph—maybe a pinch of salt or a dash more lemon juice? I always like to add a tiny bit more garlic powder for that extra flavor kick. Remember, this is your creation, so feel free to adjust it to your liking!
Step 4: Chill Before Serving
Once you’ve got the flavors just right, transfer the mixture to a serving bowl. Now, don’t rush this step! Cover it and pop it in the fridge for at least 30 minutes. Chilling allows all those incredible flavors to meld together beautifully. Plus, it thickens up just a bit, making it even more perfect for dipping. You’ll be so glad you waited!
Why You’ll Love This Recipe
Quick and easy preparation—ready in just 10 minutes!
Ultra creamy texture that’s simply irresistible
Perfect for parties, gatherings, or a cozy night in
Vegetarian-friendly, making it a great choice for everyone
Versatile dip that pairs well with pita chips, veggies, or even as a spread
Rich Mediterranean flavors that transport you straight to the sun-soaked coast
Easy to customize with your favorite herbs or spices
Great make-ahead option—just chill and serve!
Storage & Reheating Instructions
Storing your Olive Lovers’ Dream Dip is super simple! Just transfer any leftovers into an airtight container and pop it in the fridge. It’ll stay fresh for up to 3 days, so you can enjoy it again without any fuss. Just remember to cover it well to keep that creamy goodness intact!
As for reheating, you won’t really need to do that since this dip is best served chilled. Just give it a little stir before serving, and if it seems a bit thick after chilling, you can add a splash of olive oil to loosen it up. Voila! You’re all set to dive back into that deliciousness!
FAQ Section
Can I use different types of olives?
Absolutely! One of the best things about my Olive Lovers’ Dream Dip is its versatility. You can experiment with different types of olives to create your perfect flavor profile. For instance, Kalamata olives will add a robust, slightly tangy taste, while Castelvetrano olives bring a sweet and mild flavor. Feel free to mix and match based on what you love or have on hand—just be sure to adjust the ratios to keep the dip balanced!
What can I serve with this dip?
Oh, there are so many delightful options! I love serving my dip with crispy pita chips for that perfect crunch, but it’s also fantastic with fresh vegetable sticks like carrots, celery, or bell peppers. If you want to get a little fancy, you can use it as a spread on crusty bread or crackers. You can even dollop it on top of grilled meats or fish for an extra flavor boost. The possibilities are deliciously endless!
How long can I store the dip?
Your Olive Lovers’ Dream Dip will keep well in the fridge for up to 3 days when stored in an airtight container. Just make sure to seal it tightly to maintain that creamy texture and fabulous flavors. If you notice any separation, just give it a quick stir before serving again. But trust me, it’ll be hard to resist finishing it all in one go!
Nutritional Information
Here’s a quick look at the estimated nutritional values for my Olive Lovers’ Dream Dip. Keep in mind that these numbers are based on typical ingredient values, so they may vary slightly depending on the exact brands and quantities you use. But this will give you a good idea:
Serving Size: 2 tablespoons
Calories: 80
Fat: 7g
Saturated Fat: 3g
Unsaturated Fat: 4g
Trans Fat: 0g
Cholesterol: 10mg
Sodium: 200mg
Carbohydrates: 3g
Fiber: 0g
Sugar: 1g
Protein: 1g
This dip is a delightful treat that’s not only packed with flavor but also offers a satisfying bite without being overly heavy. Enjoy every creamy scoop guilt-free!
Tips for Success
Alright, let’s make sure your Olive Lovers’ Dream Dip is absolutely perfect! Here are my top tips to elevate your dip game:
Choose Fresh Ingredients: The quality of your olives will really shine through in this dip, so try to get the freshest olives you can find. Whether you’re using jarred or fresh, go for high-quality brands—they make all the difference!
Soften Your Cream Cheese: Make sure your cream cheese is softened before blending. This helps achieve that ultra-smooth texture we’re aiming for. You can leave it out at room temperature for about 30 minutes or microwave it for just a few seconds (but don’t let it melt!).
Don’t Over-Blend: When blending the olives, pulse them just enough to get a fine chop without turning them into a paste. You want some texture in your dip, so don’t go overboard!
Taste as You Go: As you’re mixing, keep tasting! This is your dip, after all, so adjust the flavors to your liking. You might find that you want a little more garlic or lemon juice to really kick it up a notch.
Chill Time is Key: Don’t skip the chilling step! Letting the dip sit in the fridge for at least 30 minutes allows those flavors to meld together beautifully, creating a tastier, more cohesive dip.
Garnish for Flair: For a little extra touch, consider garnishing your dip with a sprinkle of chopped parsley or even some extra olive slices on top before serving. It adds a lovely visual appeal!
Experiment with Mix-Ins: Feel free to play around with additional flavors! Sun-dried tomatoes, capers, or even a dash of chili flakes can add a fun twist to your classic dip.
With these tips in your back pocket, you’re all set to create the ultimate Olive Lovers’ Dream Dip! Enjoy the process and have fun with it!
I share easy, flavorful recipes that make home cooking simple, fun, and totally satisfying. Let's get in the kitchen and create something delicious together!


What do you think?
Share your thoughts, tips, or variations on this recipe!