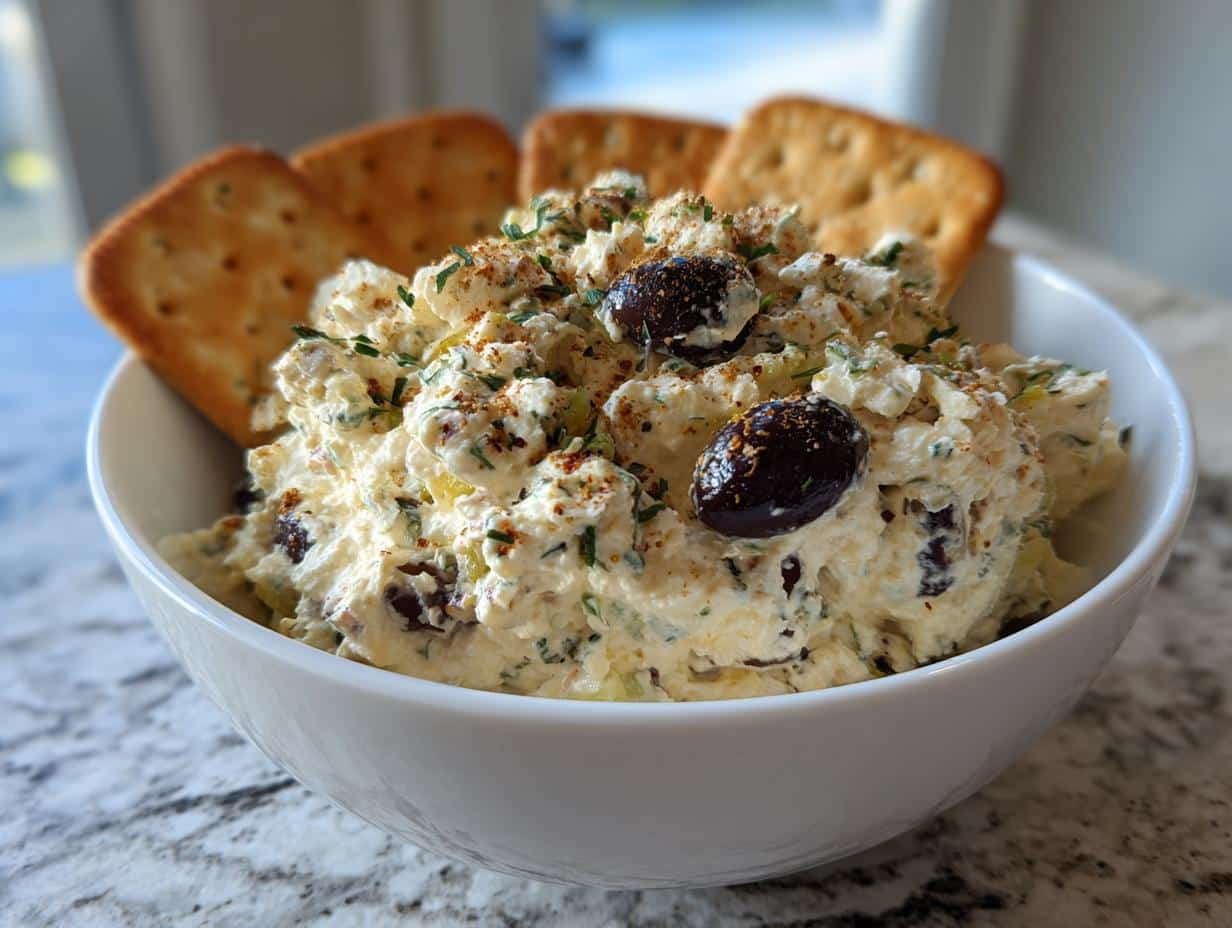
If you’re anything like me and absolutely adore olives, then you’re in for a treat with this Olive Lovers’ Dream Dip! This dip is a creamy, flavorful delight that’s perfect for any gathering or party. I mean, who doesn’t love a dip that’s both rich and bursting with olive goodness? It’s a crowd-pleaser that comes together in just a few minutes, making it an ideal choice for last-minute plans or laid-back get-togethers. Trust me, once you try it, you’ll be dreaming about it for days—and so will your friends!
Ingredients List
1 cup black olives, pitted and roughly chopped
1 cup green olives, pitted and roughly chopped
1 cup cream cheese, softened to room temperature
1/2 cup sour cream, for extra creaminess
1/4 cup mayonnaise, to enhance the flavor
1 tablespoon fresh lemon juice, to brighten the dip
1 teaspoon garlic powder, for that savory kick
1/2 teaspoon onion powder, to round out the flavors
Make sure to have your cream cheese softened—this really helps in mixing everything together smoothly. Trust me, there’s nothing worse than trying to blend cold cream cheese into a creamy dip! And don’t forget to pit those olives; it makes a world of difference when you’re diving in for a scoop. Happy prepping!
How to Prepare Olive Lovers’ Dream Dip
Alright, let’s get into the fun part—making this Olive Lovers’ Dream Dip! It’s super simple, and I promise you’ll be amazed at how quickly it comes together. Just follow these steps, and you’ll have a delicious dip ready to impress your friends in no time!
First things first, grab a mixing bowl and toss in your black and green olives. Make sure they’re pitted beforehand; trust me, nobody wants to bite into a pit while enjoying this creamy goodness! I like to chop them roughly so you get that nice texture in every scoop. Just give them a good mix to combine their flavors; this is where the olive party starts!
Step 2: Adding Creamy Ingredients
Now, let’s make it creamy! Add in the softened cream cheese, sour cream, and mayonnaise to the bowl with your olives. It’s crucial that your cream cheese is at room temperature—this helps everything blend together beautifully without any lumps. I mean, who wants a chunky dip? Not us! Use a spatula or a mixer and fold everything together until it’s all well incorporated and smooth.
Step 3: Mixing in Flavor
Next up, let’s amp up the flavor! Squeeze in the fresh lemon juice, and sprinkle in the garlic powder and onion powder. These little additions are game changers! Give everything a good stir, and don’t forget to taste as you go. You can totally adjust the seasoning to suit your vibe—more garlic, less garlic, it’s all up to you!
Step 4: Blending to Perfection
Time to blend it all to perfection! If you’ve got a food processor, now’s the time to whip it out. Pulse the mixture until it’s nice and smooth. If you’re mixing by hand, just keep stirring until you reach that creamy consistency. The goal is to have a dip that’s spreadable but still has a bit of texture from the olives. You want it to feel luxurious and rich, am I right?
Step 5: Chilling the Dip
Finally, don’t skip this step—transfer your dip to a serving bowl and pop it in the fridge for about 30 minutes. This chilling time is crucial as it allows all those flavors to meld beautifully together. Plus, it makes the dip nice and refreshing when you serve it. Trust me, letting it chill is totally worth it!
Tips for Success
To really nail this Olive Lovers’ Dream Dip, I’ve got a few handy tips that’ll ensure it turns out perfectly every time! First off, don’t be shy about tasting as you go. Adjusting the seasoning is key—maybe you want a little more garlic or a splash more lemon juice. It’s your dip, so make it your own!
Also, if you have the time, I highly recommend making this dip a day in advance. Letting it sit overnight in the fridge allows all those delicious flavors to deepen and meld together, making each bite even more heavenly. Trust me, your future self will thank you when you take that first scoop!
And one last tip—be sure to serve it cold. This dip is so much more refreshing when it’s chilled, and it gives that creamy texture a delightful bite. So, get ready to impress your friends with this fantastic, flavorful dip that’s sure to be the star of the show!
Why You’ll Love This Recipe
Quick preparation time—just 10 minutes and you’re ready to go!
Creamy and flavorful texture that keeps everyone coming back for more.
Perfect for gatherings and parties; it’s a guaranteed crowd-pleaser!
Vegetarian-friendly, making it a great option for all your guests.
Versatile serving options—pair it with crackers, vegetable sticks, or pita bread for a delightful experience!
This Olive Lovers’ Dream Dip truly checks all the boxes, so you’ll want to keep this recipe handy for every occasion. Trust me, it’s going to be a favorite in your household!
Serving Suggestions
Now that you’ve whipped up this creamy Olive Lovers’ Dream Dip, it’s time to think about how to serve it! The great news is that this dip is incredibly versatile and pairs well with so many delicious options. Here are some of my favorites:
Crackers: Any kind of crackers will do! I love using buttery Ritz or crunchy pita chips for that perfect contrast to the smooth dip.
Vegetable Sticks: Carrot sticks, celery, and bell pepper slices offer a fresh, crunchy alternative that’s not only healthy but super satisfying!
Pita Bread: Warm, soft pita bread is a classic choice. Just tear off a piece and scoop up that olive goodness!
Bread Slices: A nice crusty baguette or toasted sourdough slices can add a delightful crunch and make for an elegant presentation.
Party Platters: This dip is perfect for any gathering! Serve it alongside a cheese board, a selection of cured meats, or other dips for a fun, shareable spread.
Whether you’re hosting a casual get-together, a game night, or a fancy dinner party, this dip will fit right in. Trust me, it’s bound to be the star of the table, and your guests will be raving about it long after the last scoop! Enjoy every bite!
Storage & Reheating Instructions
Now, let’s talk about how to store any leftovers of this delicious Olive Lovers’ Dream Dip—if there are any, that is! First off, make sure to transfer the dip into an airtight container. This will keep it fresh and prevent any unwanted fridge odors from sneaking in. You can store it in the refrigerator for up to 5 days, but trust me, it’s so good you might find yourself going back for more before it even lasts that long!
When it comes to serving, this dip is best enjoyed cold. There’s no need for reheating; in fact, it’s that creamy, chilled texture that makes every bite so refreshing! Just scoop it out of the fridge and serve it straight away. So, go ahead and make a big batch—you won’t regret it when you have this delightful dip on hand for snacking anytime! Enjoy!
Nutritional Information Disclaimer
Before we dive into the deliciousness of this Olive Lovers’ Dream Dip, I want to give you a little heads-up about the nutritional information. Keep in mind that nutrition values can vary based on the specific ingredients and brands you use, so this information isn’t provided precisely. However, here’s a general idea of what you can expect per serving (about 2 tablespoons):
Calories: 100
Fat: 9g
Saturated Fat: 4g
Trans Fat: 0g
Cholesterol: 15mg
Sodium: 200mg
Carbohydrates: 3g
Fiber: 0g
Sugar: 1g
Protein: 1g
This dip is creamy and indulgent, but it’s always good to be mindful of what you’re enjoying. So, while you savor each scoop, remember to embrace the yumminess and the nutrition that comes with it! Enjoy your dip guilt-free!
FAQ Section
Can I use different types of olives?
Absolutely! While I love the combination of black and green olives, feel free to experiment with your favorites. Kalamata olives, for instance, can add a lovely tanginess! Just remember to keep the total amount consistent for the best texture.
How long can I store the dip?
You can store this Olive Lovers’ Dream Dip in an airtight container in the refrigerator for up to 5 days. But let’s be real—once your friends get a taste, it might not last that long!
Can I make this dip vegan?
Yes, you can definitely make this dip vegan! Just substitute the cream cheese, sour cream, and mayonnaise for vegan alternatives. There are plenty of delicious options available that will still give you that creamy texture we all love!
What can I substitute for sour cream?
If you’re looking for a substitute for sour cream, try using plain Greek yogurt for a similar tang, or even silken tofu blended until smooth for a dairy-free option. Both will work wonders in keeping that creamy goodness!
I share easy, flavorful recipes that make home cooking simple, fun, and totally satisfying. Let's get in the kitchen and create something delicious together!


What do you think?
Share your thoughts, tips, or variations on this recipe!