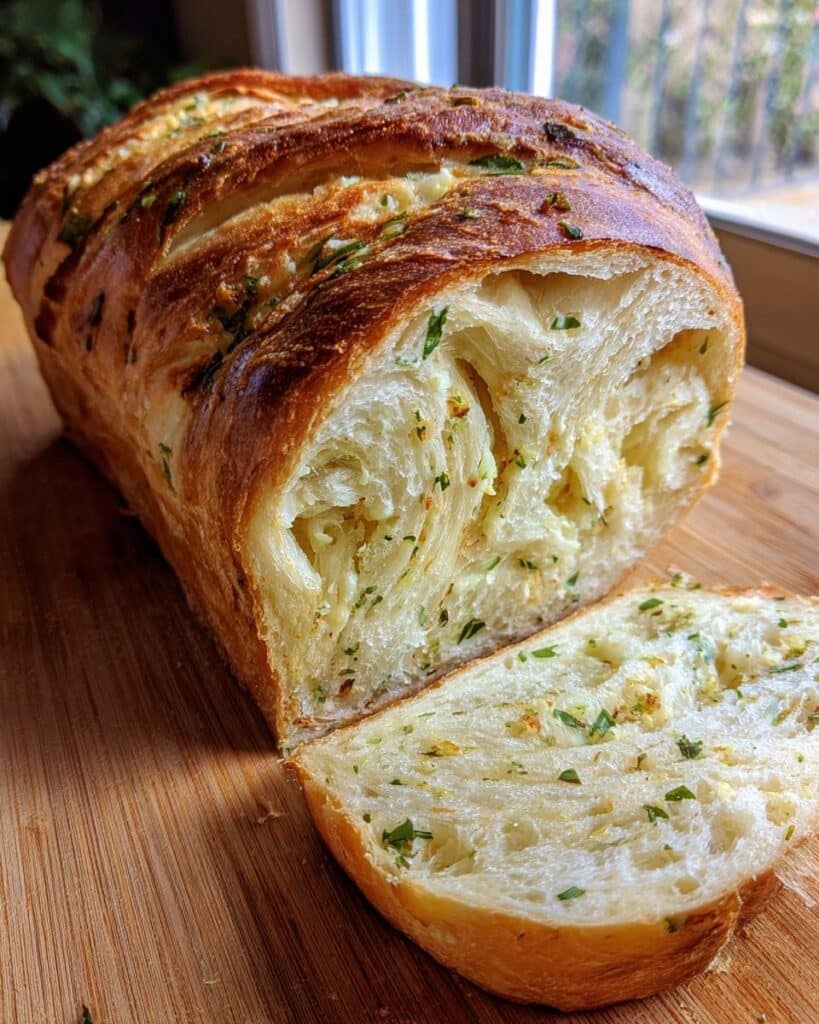
Oh boy, let me tell you about my absolute favorite bread: Swirled Garlic Herb And Cheese Bread! This bread isn’t just any bread; it’s a warm, savory hug for your taste buds! The aroma of garlic and fresh herbs fills your kitchen, and trust me, it’s enough to make anyone drool.
I remember the first time I made it for a dinner party. As soon as I pulled it out of the oven, my friends gathered around, and I could barely slice it before they were grabbing pieces! Its cheesy, herb-infused swirls are perfect for mopping up sauces or just enjoying on its own with a bit of butter. Honestly, it elevates any meal, and it’s so easy to whip up. You’re gonna love this one!
Ingredients List
2 cups all-purpose flour: This is the base of our bread, giving it structure and chewiness. Make sure to spoon it into your measuring cup and level it off for accuracy.
1 cup warm water: The warmth of the water helps activate the yeast. It should feel like a cozy bath, around 110°F (43°C) – too hot, and you risk killing the yeast!
1 packet (2 1/4 tsp) active dry yeast: This little packet is what makes your bread rise! It’s important to check the expiration date to ensure it’s still active.
1 tsp sugar: Just a touch of sugar helps feed the yeast, giving it the energy it needs to do its rising magic.
1 tsp salt: Salt not only enhances flavor but also strengthens the gluten structure, contributing to the bread’s overall texture.
2 tbsp olive oil: This adds richness and flavor to the dough, making it moist and delicious. I love using good quality extra virgin olive oil for that extra depth!
4 cloves garlic, minced: Fresh garlic is the star of this recipe! It infuses the bread with an aromatic flavor that’s simply irresistible. You can adjust the amount based on your love for garlic.
1/2 cup grated Parmesan cheese: This cheesy addition brings a savory richness and a delightful umami flavor. Feel free to use freshly grated cheese for the best melt and taste!
1/4 cup chopped fresh herbs (parsley, basil, or thyme): Fresh herbs add a vibrant flavor and color to your bread. You can mix and match based on what you have on hand or your personal favorites!
How to Prepare Swirled Garlic Herb And Cheese Bread
Step 1: Activate the Yeast
First things first, let’s wake up that yeast! In a bowl, pour your warm water and sprinkle the yeast and sugar on top. Give it a gentle stir and then let it sit for about 5 minutes. You’ll see it start to foam and bubble – that’s a good sign! This step is crucial because it ensures your yeast is alive and ready to make that bread rise beautifully. If it doesn’t foam, don’t use it; it’s probably expired.
Step 2: Mix the Ingredients
Now, it’s time to bring everything together! In the same bowl with your yeast mixture, add in the flour, salt, olive oil, minced garlic, grated Parmesan, and your fresh herbs. Using a wooden spoon or your hands, mix it all together until it forms a shaggy dough. Don’t worry if it looks a bit messy; we’ll tidy it up in the next step!
Transfer the dough to a floured surface and let’s get kneading! Knead it for about 10 minutes, folding and pressing it until it’s smooth and elastic. You’ll know it’s ready when it springs back when you poke it gently. This is the workout your dough needs to develop that glorious gluten structure!
Step 4: First Rise
Place your kneaded dough into a greased bowl, turning it a couple of times to coat it lightly in oil. Cover it with a clean kitchen towel or plastic wrap and let it rise in a warm, draft-free spot for about 1 hour. You want it to double in size, so find a cozy corner in your kitchen!
Step 5: Shape the Loaf
Once the dough has risen, it’s time to deflate it! Gently punch it down to release any excess air, then shape it into a loaf. Just tuck the ends under and place it seam-side down on a parchment-lined baking sheet. This shape will help it rise evenly during the next step!
Step 6: Second Rise
Let your shaped loaf rise again for another 30 minutes. This is also a great time to preheat your oven to 375°F (190°C). The dough should puff up a bit more, and this will ensure a light and airy texture once it bakes!
Step 7: Bake the Bread
Now comes the best part! Pop your loaf into the preheated oven and bake it for 25-30 minutes, or until it’s golden brown and sounds hollow when tapped on the bottom. Keep an eye on it during the last few minutes so it doesn’t over-bake!
Step 8: Cool and Slice
Once it’s done baking, take it out and let it cool on a wire rack. This step is super important because it helps the crust stay crisp and the inside fluffy. Resist the urge to slice it right away – let it cool for at least 15 minutes before diving in! Trust me, the wait is worth it for that perfect texture!
Nutritional Information
Curious about what’s in this delicious Swirled Garlic Herb And Cheese Bread? Here’s a breakdown of the typical nutritional values per serving (1 slice). Keep in mind that these are estimates based on the ingredients listed, and the actual values may vary a bit depending on what you use.
Calories: 150
Fat: 5g
Saturated Fat: 1g
Unsaturated Fat: 3g
Trans Fat: 0g
Cholesterol: 5mg
Sodium: 200mg
Carbohydrates: 22g
Fiber: 1g
Sugar: 0.5g
Protein: 5g
This bread is not only scrumptious but also packed with flavors and a decent amount of protein! Enjoy it as a side to your meals or just on its own – it’s a delightful addition to any table!
Why You’ll Love This Recipe
Quick Preparation: This bread comes together in just a couple of hours, making it perfect for those spontaneous meal plans or when you want to impress without spending all day in the kitchen.
Easy to Bake: With straightforward steps, even beginner bakers can create this masterpiece. No fancy equipment needed—just your hands and a bit of love!
Flavorful Profile: The combination of garlic, herbs, and cheese creates a mouthwatering aroma and taste that fills your kitchen with warmth and comfort. Seriously, it’s like a hug in bread form!
Versatile: This bread pairs beautifully with almost any meal—from pasta to soups to salads. You can also enjoy it on its own as a snack or breakfast treat. It’s flexible enough to fit any occasion!
Customizable: Feel free to experiment with different cheeses or herbs based on your preferences or what you have on hand. Each loaf can be a unique creation!
Impressive Presentation: With its gorgeous swirls and golden crust, this bread not only tastes incredible but looks stunning on any dining table. Your friends and family will be wowed!
Tips for Success
Here are some of my best tips to ensure your Swirled Garlic Herb And Cheese Bread turns out perfectly every time!
Yeast Activation: Make sure your water is warm, not hot! A cozy temperature of about 110°F (43°C) is ideal. If the water’s too hot, it can kill the yeast, and then your bread won’t rise. If you’re uncertain, err on the side of cooler water.
Kneading Techniques: When kneading the dough, use the heel of your hand to push it away from you, then fold it back over itself. This motion helps develop the gluten, giving your bread that lovely chewy texture. Remember, it should feel smooth and elastic when you’re done!
Environment Matters: For the best rise, find a warm, draft-free spot in your kitchen. If it’s chilly, you can turn on your oven to the lowest setting for a minute, then turn it off and place your dough inside to rise. It creates a nice cozy environment!
Storage Advice: To keep your bread fresh, store it in an airtight container at room temperature for up to 3 days. If you want to keep it longer, wrap it tightly in plastic wrap and freeze it for up to 3 months. Just let it thaw at room temperature before enjoying!
Check for Doneness: Knowing when your bread is baked perfectly is key! Tap the bottom of the loaf; if it sounds hollow, it’s done! If you’re unsure, you can also use an instant-read thermometer—aim for around 190°F (88°C) in the center.
With these tips in your back pocket, you’re ready to bake a loaf that will impress everyone at the table! Happy baking!
Variations
The beauty of Swirled Garlic Herb And Cheese Bread is its versatility! You can easily customize it to suit your taste or to use up what you have in your pantry. Here are some fun ideas to switch things up:
Herb Medley: Instead of just one type of herb, mix it up! Try a combination of fresh rosemary, thyme, and oregano for a more complex flavor profile. Each herb brings its unique aroma and taste.
Cheese Choices: While Parmesan is delicious, don’t be afraid to experiment with different cheeses! Gruyère, mozzarella, or even feta can create a delightful twist. Each cheese melts differently and adds its own character to the bread.
Spicy Kick: If you’re a fan of heat, add some red pepper flakes or finely chopped jalapeños to the dough. This adds a nice warmth without overpowering the savory flavors of garlic and herbs.
Seed Topping: For added texture, sprinkle some sesame seeds, poppy seeds, or even sunflower seeds on top of the loaf before baking. They not only look beautiful but also add a nice crunch!
Sweet Twist: Feeling adventurous? Try a sweet version by adding a bit of honey or maple syrup to the dough, and swap out the garlic and cheese for herbs like dill and a sprinkle of cinnamon. This makes for a lovely breakfast option!
With these variations, you can create your own signature loaf that’s totally unique to you. Let your creativity run wild and have fun in the kitchen!
Storage & Reheating Instructions
Now that you’ve made this delicious Swirled Garlic Herb And Cheese Bread, you might be wondering how to keep it fresh for as long as possible. Here’s how to store those tasty leftovers! First off, once your bread has completely cooled on the wire rack, wrap it tightly in plastic wrap or place it in an airtight container. This will help keep that lovely texture intact and prevent it from drying out. You can store it at room temperature for up to 3 days.
If you want to keep it for longer, you can also freeze it! Just wrap the loaf tightly in plastic wrap and then in aluminum foil, or use a freezer-safe bag. It’s good for up to 3 months in the freezer. When you’re ready to enjoy it again, simply remove it from the freezer and let it thaw at room temperature for a few hours, or overnight in the fridge.
As for reheating, I recommend slicing it first before warming it up. You can pop the slices in a toaster or a toaster oven for a few minutes until they’re warmed through and crispy on the outside. Alternatively, you can wrap the whole loaf in aluminum foil and place it in a preheated oven at 350°F (175°C) for about 10-15 minutes. This will revive the crust and make it feel freshly baked again!
With these storage and reheating tips, you’ll always have a delightful slice of homemade bread ready to enjoy whenever a craving strikes!
FAQ Section
Can I use instant yeast instead of active dry yeast? Absolutely! If you’re using instant yeast, you can mix it directly with the dry ingredients without needing to activate it first. Just reduce the amount slightly, about 1/4 teaspoon less, and you’re good to go!
What if my dough doesn’t rise? Oh no! If your dough doesn’t rise, it could be due to a few reasons. Make sure your yeast is fresh and that you used warm water, not hot. If your kitchen is too cold, try placing the dough in a warmer spot, like near your oven while it’s preheating.
Can I make this bread ahead of time? Yes! You can prepare the dough up to the first rise, then shape it and refrigerate it overnight. Just let it come to room temperature before the second rise and baking. It makes for a fantastic fresh bread option for breakfast or dinner!
How can I tell when my bread is done baking? Great question! Your bread should be golden brown and sound hollow when tapped on the bottom. If you’re unsure, you can also use a thermometer; it should read around 190°F (88°C) in the center when it’s perfectly baked.
What are some good serving suggestions for this bread? This Swirled Garlic Herb And Cheese Bread is super versatile! It pairs wonderfully with soups, salads, or pasta dishes. You can also serve it warm with a side of olive oil or balsamic vinegar for dipping. Or, just enjoy it fresh out of the oven with a pat of butter – trust me, it’s heavenly!
I share easy, flavorful recipes that make home cooking simple, fun, and totally satisfying. Let's get in the kitchen and create something delicious together!


What do you think?
Share your thoughts, tips, or variations on this recipe!