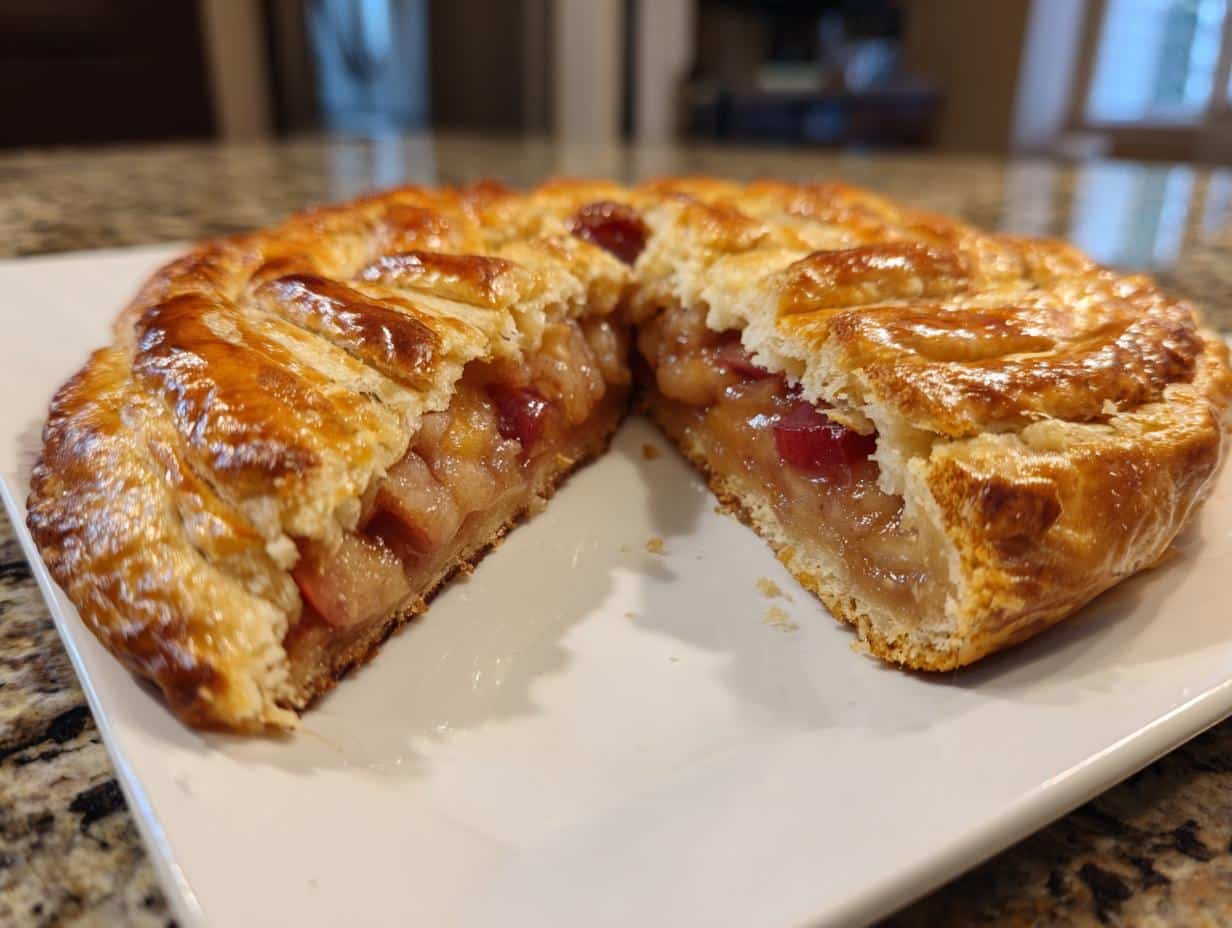
Oh, let me tell you about Wisconsin Kringle! This delightful pastry is a true gem that hails from the heart of Wisconsin. It’s famous for its flaky, buttery crust wrapped around a generous filling of fruit or nuts—just thinking about it makes my mouth water! The beauty of Wisconsin Kringle is in its versatility; you can fill it with whatever your heart desires, whether that’s sweet raspberry preserves or rich almond paste. It’s the perfect treat for breakfast, dessert, or any time you need a little pick-me-up. I just love how it brings people together, and trust me, once you try making it, you’ll be hooked!
Ingredients for Wisconsin Kringle
Gathering the right ingredients is the first step to creating a mouthwatering Wisconsin Kringle. Here’s what you’ll need:
2 cups all-purpose flour: This is the foundation of your pastry, giving it that wonderful texture.
1/2 cup unsalted butter, chilled: Cold butter is key to achieving that flaky crust we all love. Make sure it’s nice and firm!
1/2 cup sour cream: This adds moisture and richness, making the dough tender and delicious.
1 tablespoon sugar: Just a touch to sweeten the dough and balance the flavors.
1/2 teaspoon salt: A little salt enhances all the other flavors, so don’t skip it!
1 egg yolk: This helps bind the dough together and adds richness.
1 cup filling of your choice: Whether you go for fruity goodness like raspberry or nutty delights like almond, the filling is where the magic happens!
1 egg white, beaten: This will be brushed on top for a beautiful, shiny finish.
These ingredients come together to create a delightful pastry that’s sure to impress. Now, let’s get ready to roll up our sleeves and make some Kringle magic!
Now it’s time to transform those ingredients into a stunning Wisconsin Kringle! Don’t worry; I’ll guide you through every step, and soon you’ll have a delicious pastry to enjoy. Let’s dive in!
Step-by-Step Instructions
First, in a large mixing bowl, combine the all-purpose flour, sugar, and salt. Give it a quick stir to mix everything together.
Next, cut in the chilled unsalted butter using a pastry cutter or your fingers until the mixture resembles coarse crumbs. This is where the magic begins—keep it cold for that flaky texture!
Now, add the sour cream and egg yolk to the bowl. Mix until everything comes together. You want a nice dough that holds its shape.
Once your dough is ready, form it into a ball, wrap it in plastic wrap, and pop it in the refrigerator for about 1 hour. This step is crucial for keeping that flaky goodness!
After an hour, take the dough out and roll it out on a floured surface into a rectangle, about 1/4 inch thick. Don’t worry if it’s not perfect; it’ll still be delicious!
Spread your chosen filling down the center of the dough. Be generous—this is the part that makes your Kringle sing!
Now, fold the edges of the dough over the filling to form a log. Make sure the seams are sealed well so that the filling stays inside.
Place your Kringle on a baking sheet, seam side down, and brush the top with the beaten egg white for that lovely golden finish.
Finally, bake in a preheated oven at 375°F (190°C) for about 25-30 minutes, or until it’s a beautiful golden brown. The smell will be absolutely irresistible!
Let it cool for a bit before slicing and serving. You did it—you made Wisconsin Kringle!
Why You’ll Love This Recipe
Wisconsin Kringle is not just a pastry; it’s a celebration of flavors and a joy to make! Here are a few reasons why you’re going to fall head over heels for this recipe:
Easy to Prepare: With straightforward steps, even a novice baker can whip up this delightful pastry with ease. Trust me, it’s more about the love you put into it than the skill!
Delicious Flavor Combinations: Whether you choose fruity fillings like raspberry or nutty delights such as almond, each bite is bursting with flavor. You can even mix and match to create your own signature Kringle!
Perfect for Any Occasion: This pastry is versatile enough for breakfast, dessert, or even a special gathering. It’s sure to impress friends and family alike!
Joy of Baking at Home: There’s something incredibly satisfying about making your own pastry from scratch. The smell wafting through your kitchen as it bakes is pure bliss!
Customization: You can easily adapt this recipe to suit your tastes or dietary preferences. Don’t hesitate to experiment with different fillings or toppings!
Once you give this Wisconsin Kringle a try, I guarantee you’ll be making it again and again!
Tips for Success with Wisconsin Kringle
To make sure your Wisconsin Kringle turns out perfectly every time, here are some of my favorite tips and tricks. Trust me, these little insights can make a big difference!
Keep Everything Cold: The key to that flaky crust is keeping your butter and dough cold. If you feel the dough getting too warm while you’re working with it, just pop it back in the fridge for a few minutes.
Filling Choices: Don’t be afraid to get creative with your fillings! While traditional options like raspberry and almond are fantastic, you could also try pecan, cherry, or even chocolate ganache for a decadent twist. Just remember to not overfill; a generous layer is great, but too much can make it messy!
Seal It Up: When folding the dough over the filling, make sure to pinch the seams tightly to prevent any leakage while baking. A little extra effort here will keep all that deliciousness inside!
Baking Time: Keep an eye on your Kringle as it bakes. Ovens can vary, and you might find that yours cooks a bit quicker or slower. Look for that golden brown color and the smell of buttery goodness wafting through your kitchen!
Cool Before Slicing: Let your Kringle cool for at least 10-15 minutes after baking. This helps it set a bit more and makes slicing easier. Plus, it’ll be less likely to fall apart when you serve it!
Experiment with Glazes: For an extra touch of sweetness, consider drizzling a simple glaze made from powdered sugar and milk over your cooled Kringle. It adds a lovely finish and makes it even more irresistible!
With these tips in your back pocket, you’ll be a Wisconsin Kringle pro in no time. Enjoy the process, and happy baking!
Storage & Reheating Instructions
After you’ve enjoyed your delicious Wisconsin Kringle, you might find yourself with some leftovers—if you’re lucky! Storing it properly will ensure it stays fresh and tasty for days to come.
To store your Kringle, let it cool completely first. Then, wrap it tightly in plastic wrap or aluminum foil. This will help keep out air and prevent it from drying out. You can also place it in an airtight container for added protection. Stored this way, it can last in the refrigerator for about 3-5 days.
If you want to enjoy your Kringle later, you can freeze it too! Just wrap it securely in plastic wrap, then place it in a freezer-safe bag or container. It should keep well for up to 2 months. When you’re ready to enjoy it again, simply thaw it overnight in the refrigerator.
Now, when it comes to reheating your Kringle, I recommend using the oven to maintain its flaky texture. Preheat your oven to 350°F (175°C), and place the Kringle on a baking sheet. Cover it loosely with aluminum foil to prevent over-browning, and heat for about 10-15 minutes or until warmed through. If you’re in a hurry, you can pop a slice in the microwave for about 15-20 seconds, but be mindful it may lose some of that lovely crispiness.
By following these storage and reheating tips, you can savor every last bite of your Wisconsin Kringle just as deliciously as the day you made it!
FAQ about Wisconsin Kringle
Can I use different fillings for my Wisconsin Kringle? Absolutely! One of the best parts about making Wisconsin Kringle is the versatility in fillings. You can use fruit preserves, like raspberry or cherry, nut fillings such as almond paste, or even chocolate for a sweet twist. Just remember to keep the filling generous but not overflowing!
How do I know when my Kringle is done baking? Great question! Your Kringle is ready when it’s a beautiful golden brown on top. If you gently tap the crust, it should sound hollow. Trust your nose, too! The aroma of buttery goodness will fill your kitchen, and that’s your cue that it’s almost time to enjoy it!
Can I make Wisconsin Kringle in advance? Yes, you can! The dough can be prepared and refrigerated for up to 24 hours before shaping and baking. You can also bake the Kringle ahead of time, let it cool, and store it. Just follow the storage tips I shared to keep it fresh!
Is Wisconsin Kringle difficult to make? Not at all! While it might seem a bit fancy, Wisconsin Kringle is quite approachable, even for beginner bakers. The step-by-step instructions make it easy to follow. Just take your time and enjoy the process. You’ll be amazed at how rewarding it feels to make it from scratch!
Can I freeze leftover Wisconsin Kringle? Definitely! If you have leftovers, just wrap your Kringle tightly in plastic wrap and then place it in a freezer-safe bag. It can be frozen for up to 2 months. When you’re ready to enjoy it again, simply thaw it in the refrigerator and reheat for the best texture.
Nutritional Information for Wisconsin Kringle
Before you dive into this delightful Wisconsin Kringle, it’s good to know what you’re savoring! Keep in mind that nutritional values can vary based on the specific ingredients and brands you use, so this is just a general guideline. A typical serving, which is about one slice, contains approximately 250 calories. You’ll also find about 15 grams of fat, with around 9 grams being saturated fat. On the protein front, there’s roughly 3 grams, and it has about 30 grams of carbohydrates, including 5 grams of sugar. With that in mind, enjoy your Kringle guilt-free, knowing it’s a delicious treat to brighten your day!
For more information on the health benefits of nuts, check out this Healthline article.
I share easy, flavorful recipes that make home cooking simple, fun, and totally satisfying. Let's get in the kitchen and create something delicious together!


What do you think?
Share your thoughts, tips, or variations on this recipe!