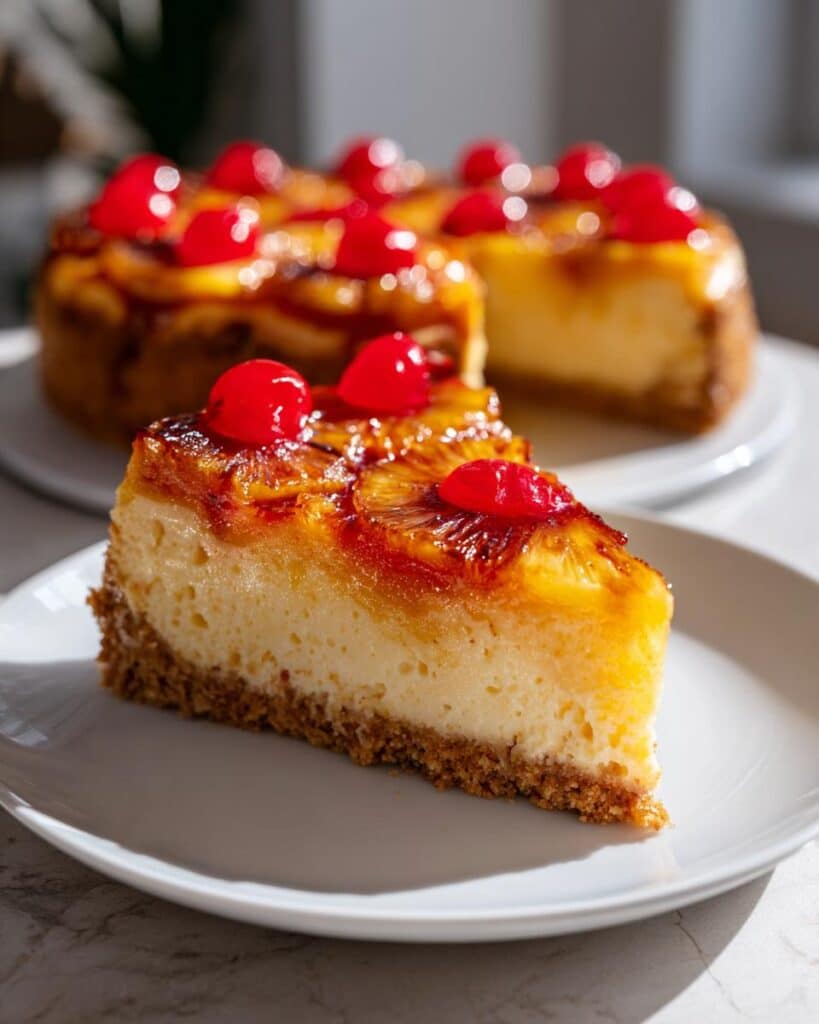
Oh boy, let me tell you about my Creamy Pineapple Cheesecake! This dessert is a slice of tropical paradise with its rich, velvety texture and a delightful burst of pineapple flavor. I remember the first time I made this for a family gathering; the moment I took it out of the fridge, the whole house smelled heavenly! Everyone gathered around, and you could just see their eyes light up with excitement. The best part? It’s surprisingly easy to whip up! Trust me, once you taste this cheesecake, you’ll be dreaming about it long after the last bite. It’s a real crowd-pleaser!
Ingredients
1 1/2 cups graham cracker crumbs
1/2 cup sugar
1/2 cup butter, melted
3 (8 ounce) packages cream cheese, softened
1 cup sugar
1 teaspoon vanilla extract
3 large eggs
1 cup crushed pineapple, drained
1 cup sour cream
How to Prepare Creamy Pineapple Cheesecake
Alright, let’s dive into creating this dreamy Creamy Pineapple Cheesecake! Follow these steps, and you’ll be well on your way to tropical bliss. I promise it’s simpler than it sounds!
Preparing the Crust
First things first, let’s whip up that yummy graham cracker crust! In a medium bowl, combine the graham cracker crumbs, 1/2 cup sugar, and melted butter. Mix everything together until it resembles wet sand. It should hold together when you pinch it. Now, pour this mixture into a springform pan and press it firmly into the bottom. I like to use the bottom of a measuring cup to get it nice and even. You want a sturdy base for all that creamy goodness!
Now onto the filling! In a large bowl, beat the softened cream cheese until it’s super smooth and creamy. This is key for a luscious texture! Gradually add in 1 cup sugar and vanilla extract, mixing well. Next, add the eggs one at a time, making sure to mix just until combined after each addition. The trick here is not to overmix; we want it fluffy but not too airy. Once that’s done, gently fold in the drained crushed pineapple and sour cream until everything is well blended.
Baking the Cheesecake
Time to bake! Pour that beautiful filling over the crust in the pan. Pop it into a preheated oven at 325°F (160°C) and let it bake for 55-60 minutes. You’ll know it’s done when the edges are set, but the center still has a slight jiggle. Don’t worry, it will firm up as it cools! Once baked, take it out and let it cool at room temperature before transferring it to the fridge.
Chilling and Serving
Chilling is crucial, so cover your cheesecake and refrigerate it for at least 4 hours (or overnight if you can wait!). This helps deepen the flavors and gives it that perfect creamy texture. When you’re ready to serve, top it off with some whipped cream or fresh pineapple for a tropical touch. Trust me, your guests will be swooning!
Why You’ll Love This Recipe
Quick prep time: You can whip this up in just about 20 minutes!
Easy to make: Even if you’re a beginner, this recipe is straightforward and forgiving.
Deliciously creamy: The combination of cream cheese and sour cream makes for a rich, velvety texture.
Tropical flavor: The pineapple adds a refreshing twist that’s perfect for summer or any occasion.
Great for gatherings: This cheesecake is a crowd-pleaser that will impress friends and family alike!
Make-ahead friendly: Prepare it a day in advance for stress-free entertaining.
Versatile toppings: You can serve it with whipped cream, fresh pineapple, or even a drizzle of caramel for extra flair.
Perfectly balanced sweetness: It’s just the right amount of sweet, making it an ideal dessert.
Tips for Success
Now, let’s make sure your Creamy Pineapple Cheesecake turns out absolutely perfect! Here are some pro tips I swear by:
Bring Ingredients to Room Temperature: Always take your cream cheese and eggs out of the fridge about 30 minutes before you start. This helps everything mix together smoothly and prevents lumps in your filling.
Don’t Overmix: When you’re combining the filling, mix just until everything is incorporated. Overmixing can add too much air, which might cause cracks in your cheesecake as it bakes.
Check for Doneness: Keep an eye on it towards the end of baking! The cheesecake should be set around the edges with a slight jiggle in the center. It will firm up as it cools, so don’t be tempted to bake it until completely firm.
Cooling is Key: Let the cheesecake cool to room temperature before refrigerating. This helps avoid condensation, which can make the top a bit soggy.
Cover While Chilling: Cover your cheesecake with plastic wrap or foil while it chills. This will keep it from absorbing any odors from the fridge and will help maintain that lovely creamy texture.
Garnish Just Before Serving: If you’re adding toppings like whipped cream or fresh pineapple, do it right before serving. This keeps them fresh and looking beautiful!
Store Properly: Leftover cheesecake can be stored in an airtight container in the fridge for up to a week. If you want to keep it longer, you can freeze slices wrapped tightly in plastic wrap and foil for up to two months. Just thaw in the fridge overnight!
By following these tips, you’ll be well on your way to a cheesecake that’s not only delicious but also visually stunning. Happy baking!
Nutritional Information
Here’s a quick rundown of the nutritional values for a slice of my Creamy Pineapple Cheesecake. Keep in mind that these are estimates and can vary based on specific brands and ingredients used:
Calories: 350
Fat: 22g
Saturated Fat: 12g
Unsaturated Fat: 8g
Trans Fat: 0g
Carbohydrates: 30g
Sugar: 25g
Fiber: 1g
Protein: 5g
Sodium: 300mg
Cholesterol: 70mg
So, while it’s definitely a treat, it’s also a delightful balance of flavors and textures that makes every bite worth it! Enjoy responsibly, and remember, it’s okay to indulge every once in a while!
FAQ Section
Got questions about my Creamy Pineapple Cheesecake? I’ve got you covered! Here are some common queries I get, along with my best answers:
Can I use fresh pineapple instead of canned?
Absolutely! Just make sure to finely chop and drain any excess juice to avoid adding too much moisture to your cheesecake.
What if I don’t have a springform pan?
No worries! You can use a regular round cake pan, but be sure to line the bottom with parchment paper for easy removal. Just let it cool completely before attempting to take it out.
Can I make this cheesecake ahead of time?
Yes! In fact, I recommend making it a day in advance. It tastes even better after chilling overnight, allowing all those delicious flavors to meld together.
What’s the best way to store leftovers?
Store any leftovers in an airtight container in the fridge for up to a week. You can also freeze slices wrapped tightly in plastic wrap and foil for up to two months. Just thaw in the fridge overnight when you’re ready to enjoy!
Can I use a different type of crust?
Definitely! You can get creative with your crust by using crushed cookies like vanilla wafers or even a chocolate cookie crust. Just make sure to adjust the sugar if your cookies are sweet.
How do I know when the cheesecake is done?
The edges should be set, but the center should still have a slight jiggle. It will continue to firm up as it cools, so don’t worry if it looks a bit wobbly when you take it out!
What toppings do you recommend?
I love topping it with whipped cream and fresh pineapple for a tropical touch! You could also drizzle some caramel or chocolate sauce for an extra indulgence.
Can I make this cheesecake gluten-free?
Yes! Just use gluten-free graham crackers or another gluten-free cookie for the crust, and you’re all set!
I hope these answers help you on your cheesecake journey! If you have any other questions, feel free to reach out. Happy baking!
Storage & Reheating Instructions
Storing your Creamy Pineapple Cheesecake properly will help keep it fresh and delicious! Here’s how to do it:
First off, if you have any leftovers (which I hope you do because it’s so good!), let the cheesecake cool completely at room temperature. Then, cover it tightly with plastic wrap or aluminum foil to prevent it from absorbing any odors from the fridge. You can store it in the refrigerator for up to a week. Just slice as needed!
If you want to keep it longer, you can freeze your cheesecake! Slice it into individual portions, then wrap each slice tightly in plastic wrap followed by aluminum foil. This double wrapping helps prevent freezer burn. You can freeze it for up to two months—perfect for those sudden cravings! When you’re ready to enjoy, simply thaw a slice overnight in the refrigerator. No reheating needed; it’s best served chilled!
Just remember, if you’ve topped it with whipped cream or any fresh fruits, it’s best to add those right before serving. Enjoy every creamy, dreamy bite!
I share easy, flavorful recipes that make home cooking simple, fun, and totally satisfying. Let's get in the kitchen and create something delicious together!


What do you think?
Share your thoughts, tips, or variations on this recipe!